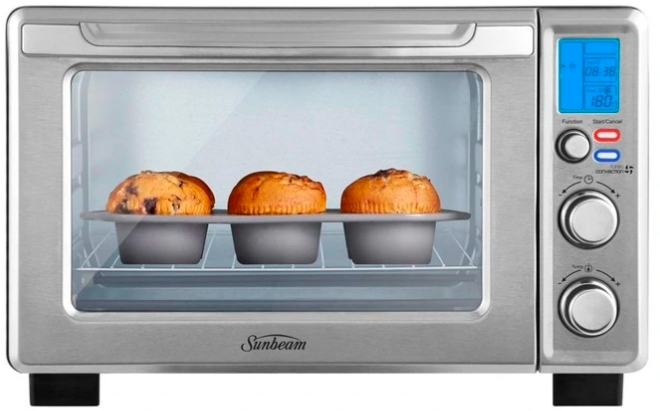
Sunbeam BT7100 Quick Start Digital Oven
Sunbeam’s Safety Precautions – Sunbeam
SAFETY PRECAUTIONS FOR YOUR SUNBEAM QUICK START OVEN.
- Always operate on a flat surface.
- Avoid contact with oven surfaces, including oven doors, during and after use, as they will be hot.
- Use well away from walls and curtains.
- Do not place items on top of the oven whilst in use.
- Do not block or cover the air vents on the top, back or side of the oven.
- Do not use it in confined spaces.
- Do not immerse the unit in water.
Sunbeam is very safety conscious when designing and manufacturing consumer products, but it is essential that the product user also exercise care when using an electrical appliance. Listed below are precautions which are essential for the safe use of an electrical appliance:
- Read carefully and save all the instructions provided with an appliance.
- Always turn the power off at the power outlet before you insert or remove a plug. Remove by grasping the plug – do not pull on the cord.
- Turn the power off and remove the plug when the appliance is not in use and before cleaning.
- Do not use your appliance with an extension cord unless this cord has been checked and tested by a qualified technician or service person.
- Always use your appliance from a power outlet of the voltage (A.C. only) marked on the appliance.
- This appliance is not intended for use by persons (including children) with reduced physical, sensory or mental capabilities, or lack of experience and knowledge unless they have been given supervision or instruction concerning the use of the appliance by a person responsible for their safety.
Features of your Sunbeam Quick Start Oven
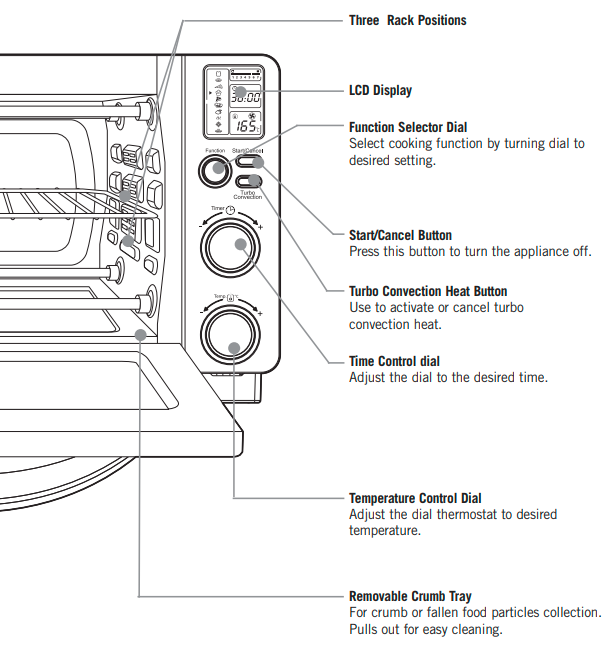
LCD Display
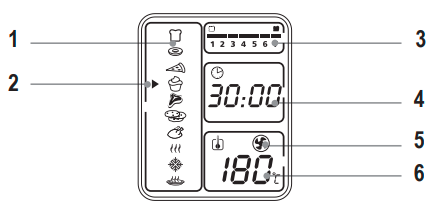
- Function Indicator – Toast, Crumpet, Pizza, Bake, Grill, Cookies, Roast, Warm, Defrost, Reheat/Preheat
- Function Indicator Arrow
- 1-7 colour shade setting indicator
- Time Indicator
- Turbo Convection Heat Icon
- Temperature Indicator
Using your Quick Start Oven
Position the oven on a dry, level surface, ensuring that the ventilation slots on the side and top of the appliance are not obstructed. Plug the power cord into a 220-240 volt power outlet and turn the power on. The oven will emit 2 long ‘beeps’ and the LCD screen will illuminate.
Note: When turned on for the first time, your Quick Start Oven may give off vapours for up to 10 minutes. This is due to the initial heating of the materials used. It is safe, not detrimental to the performance of the oven and will not reoccur.
Important: Do not force open the oven door beyond its limit or let the door drop open as this will distort the door’s ability to maintain a proper seal.
- Step 1. Select Function:
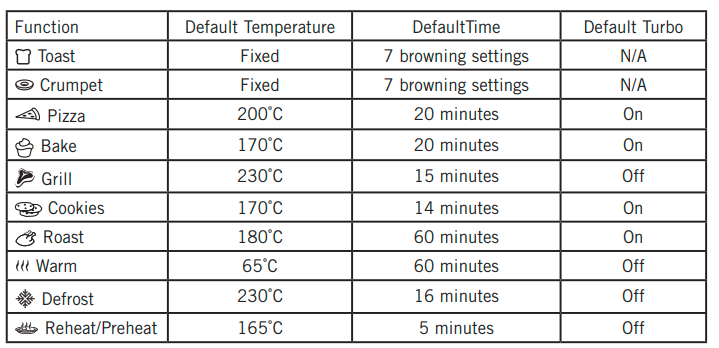
Turn the ‘Function’ dial to choose one of the following 10 options from the menu: Toast, Crumpet, Pizza, Bake, Grill, Cookies, Roast, Warm, Defrost and Reheat/Preheat. The indicator arrow will move from function to function as the dial is turned. - Step 2. Time:
Turn the time dial to increase or decrease the cooking time. The maximum time setting is 60 minutes. - Step 3. Temperature:
Turn the temperature dial to increase or decrease the temperature setting.
Using the Toast Function
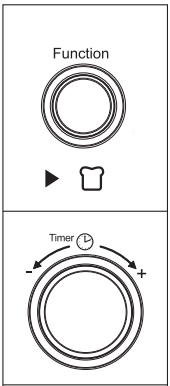
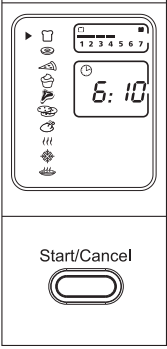
- Step 1. Turn the Function Dial to the Toast function. When you select the Toast function, the 1-7 colour shade setting indicator will become visible on the LCD. Both upper and lower heating elements will heat.
- Step 2. To adjust the shade colour:
Turn the Time Dial to adjust the shade colour. The colour shade-setting indicator will show your selection as you turn the dial. - Step 3. To Start:
Press the Start/Cancel Button to start the toasting process. The red Start/Cancel Button light will illuminate. The LCD Display will show the Toast Function, the shade colour selection and the countdown time. The oven will begin to operate and the timer will start counting down.
NOTE: You can cancel the toasting cycle at any time by pressing the Start/Cancel Button once. The red Start/Cancel Button light will turn off whenever a function has been completed or a function is manually cancelled.
Rack Positioning Guide
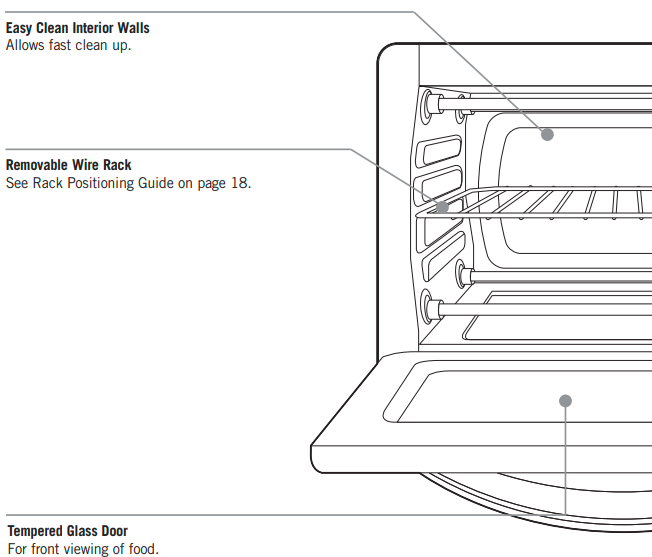
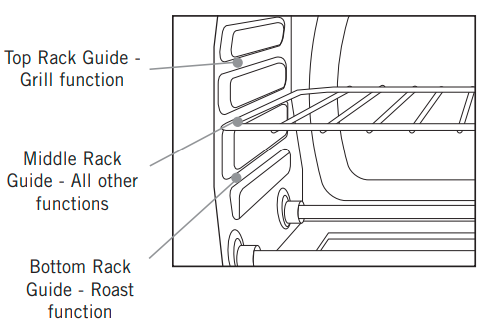
- To accommodate a wide variety of foods the oven has three rack positions. The rack can be inserted in the oven in the upper or lower rack guides. (See diagram below)
- Before removing the rack allow the unit to cool.
- To remove the rack, open the oven door and pull the rack towards the front of the oven. The rack will slide on the rack guides on the inside of the oven.
- Positioning of the oven rack will depend on the size of the food and desired browning. Move the rack to the lower rack position to prevent top browning and move the rack to the upper rack position to prevent bottom browning.
Care and Cleaning
- Always turn the power off and remove the plug from the power outlet after use and before cleaning. Allow the oven to cool before cleaning.
- It is recommended that you clean the oven after each use to prevent a build-up of grease and to avoid unpleasant odours.
NOTE: Do not clean any part of the oven in the dishwasher. - The wire rack, baking pan and pizza tray may be washed in warm soapy water and rinsed.
- The interior walls and ceiling of the oven can be wiped with a mild detergent and a damp cloth.
- To clean the exterior of the oven, wipe the walls with a cloth dampened with mild detergent. Polish with a soft dry cloth.
- To clean the glass door, wipe with a damp sponge and dry.
WARRANTY
This Sunbeam product is covered by a 12-month replacement or repair warranty, which is in addition to your rights under the Australian Consumer Law if your product was purchased in Australia) or New Zealand Consumer Guarantees Act (if your product was purchased in New Zealand).
Our replacement or repair warranty only applies where a defect arises as a result of faulty material or workmanship during the warranty period. Your warranty does not cover misuse or negligent handling (including damage caused by failing to use the product by this instruction booklet), accidental damage, or normal wear and tear.
Your warranty does not:
- cover freight or any other costs incurred in making a claim, consumable items, accessories that by their nature and limited lifespan require periodic renewal (such as filters and seals) or any consequential loss or damage; or
- cover damage caused by:
- power surges, power dips, voltage supply problems, or use of the product on incorrect voltage;
- servicing or modification of the product other than by Sunbeam or an authorised Sunbeam service centre;
- use of the product with other accessories, attachments, product supplies, parts or devices that do not conform to Sunbeam specifications; or
- exposure of the product to abnormally corrosive conditions; or
- extend beyond 3 months if the product is used in commercial, industrial, educational or rental applications.
Should your product require repair or service after the warranty period, contact your nearest Sunbeam service centre. For a complete list of Sunbeam’s service centres, visit our website or call our customer service line for advice on 1300 881 861 in Australia, or 0800 786 232 in New Zealand.
Need help with your appliance?
Contact our customer service team or visit our website for information and tips on getting the most from your appliance.
Australia
www.sunbeam.com.au
1300 881 861 Units 5 & 6, 13 Lord Street, Botany NSW 2019 Australia
New Zealand
www.sunbeam.co.nz
0800 786 232 Level 6, Building 5, Central Park, 660-670 Great South Road, Greenlane, Auckland New Zealand
Sunbeam Corporation Limited | ABN 45 000 006 771 Sunbeam is a registered trade mark. Made in China to Sunbeam’s specifications. Due to minor changes in design or otherwise, the product you buy may differ slightly from the one shown here. Approved by the appropriate electrical regulatory authorities. ©Sunbeam Corporation Limited 2017.
FAQs About Sunbeam BT7100 Quick Start Digital Oven
What is the BT7100’s capacity?
With its ten pre-programmed quick start modes, this digital oven makes preparing your favourite dishes even simpler.
How is a Sunbeam oven used?
Before heating the oven, adjust the oven rack to the desired position. (See Section on “Positioning Rack”). To achieve the required temperature, turn the temperature control knob. Adjust the knob to the preferred mode. Preheat the oven for 7 to 9 minutes after setting the timer knob to the appropriate duration.
How do these digital ovens?
An oven that uses digital control as its interface, as opposed to ones that rely on analogue buttons or a manual timer, is known as a digital electric oven.
How should my oven be cleaned?
To form a paste that may be distributed, combine roughly 1/2 cup baking soda with a small amount of water. Gradually add a small amount of warm water to the baking soda until the desired consistency is reached. The size of your oven will determine how much paste you need to produce. Apply the paste with a standard paintbrush inside the oven.
How much heat does an oven produce?
In an oven, radiation disperses heat from the heating element while hot air moves through artificial or natural convection. Conduction of heat from the baking metal container to the baked product occurs during the baking process.
What makes ovens function?
A broiler uses the direct, radiant heat of burning gas, whereas a frying pan uses hot metal and oil. Heat is transferred by air in ovens; food is cooked when hot air rises up into the oven from the burning of gas or heating of an element at the bottom of the oven.
How do I regularly clean my oven?
Typical Cleaning of the Oven
As soon as the oven has cooled enough, clean up spills and drips. Kenny Schultz, the COO of MyClean, suggests incorporating a brief oven cleaning with baking soda and water into your everyday kitchen hygiene regimen. Additionally, remember to wipe the oven drawer—a common hiding place for crumbs.
How was the oven invented?
The first ovens were created by the Egyptians. The earliest known examples are cylindrical pots with a horizontal shelf-like partition dividing them within, and formed of baked Nile clay that taper at the top to form a cone shape. The baking chamber is located above, and the firebox is located below.
Do ovens pose health risks?
Depending on the ingredients and techniques used during preparation, baked goods can be nutritious. Since baking, roasting, and grilling don’t call for the addition of extra oils or fats, they are typically regarded as healthier cooking techniques than frying.
What sign represents a typical oven?
The traditional setting symbol consists of two straight lines, one at the top and one at the bottom, denoting simultaneous heat radiation from the top and bottom heating elements.
For More Manuals by Sunbeam, Visit Latest Manuals
 |
Sunbeam BT7100 Quick Start Digital Oven User Guide [pdf] |


