Krups Breakfast Set Stainless Steel Waffle Maker
DESCRIPTION
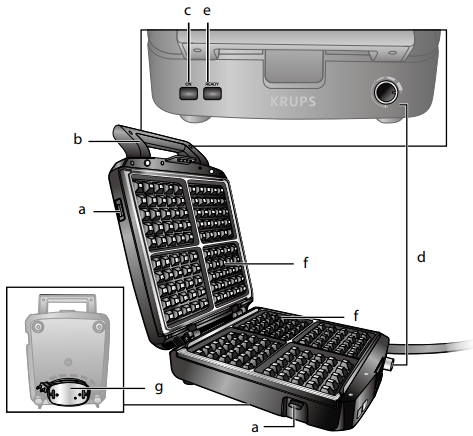
- Plate release buttons
- Handle with a locking latch
- On indicator
- Browning selector
- Ready indicator with beep
- Removable heating plates
- Cord storage compartment
Installation

IMPORTANT SAFEGUARDS
When using electrical appliances, basic safety precautions should always be followed, including the following:
- Read all instructions before use.
- Do not touch hot surfaces. Use handles or knobs.
- To protect against electric shock, do not immerse cords, plugs, or appliances in water or other liquids.
- Close supervision is necessary when any appliance is used by or near children.
- Unplug from the outlet when not in use and before cleaning. Allow to cool before putting on or taking off parts, and before cleaning the appliance.
- Do not operate the appliance with a damaged cord or plug or after the appliance malfunctions, or has been damaged in any manner. Return the appliance to the nearest authorized service facility for examination, repair, or adjustment.
- Accessory attachments not recommended by the appliance manufacturer may cause injuries.
- Do not use outdoors.
- Do not let the cord hang over the edge of the table or counter, or touch hot surfaces.
- Do not place on or near a hot gas or electric burner, or in a heated oven.
- Extreme caution must be used when moving an appliance containing hot oil or other hot liquids.
- Always attach the plug to the appliance first, then plug the cord into the wall outlet. To disconnect, turn any control to “off”, then remove the plug from the wall outlet.
- Do not use the appliance for other than intended use.
SAVE THESE INSTRUCTIONS
- If you have any problems, contact the authorized after-sales service center or the internet address www.krupsusa.com
Polarization instructions
- If this appliance has a polarized plug (one blade is wider than the other), it is to reduce the risk of electric shock. This plug is intended to fit into a polarized outlet only one way. If the plug does not fit fully into the outlet, reverse the plug. If it still does not fit, contact a qualified electrician. Do not attempt to modify the plug in any way.
Short Cord instructions
A short power-supply cord (or detachable power-supply cord) is to be provided to reduce the risk resulting from becoming entangled in or tripping over a longer cord. Longer detachable power-supply cords or extension cords are available and may be used if care is exercised in their use.
If a long detachable power-supply cord or extension cord is used:
- The marked electrical rating of the cord or extension cord should be at least as great as the electrical rating of the appliance;
- If the appliance is of the grounded type, the extension cord should be a grounding 3-wire cord; and
- The length of the cord should be arranged so that it does not drape over the countertop or tabletop where it can be pulled on by children or tripped over unintentionally.
BEFORE USE
- Remove all packaging and stickers from your waffle maker and wipe the housing and plates with a damp cloth to remove any dust or residue remaining from manufacturing.
- We recommend seasoning the non-stick plates with cooking spray or oil before use. For best results, it is suggested to repeat this process at the start of each use.
ASSEMBLY/DISASSEMBLY
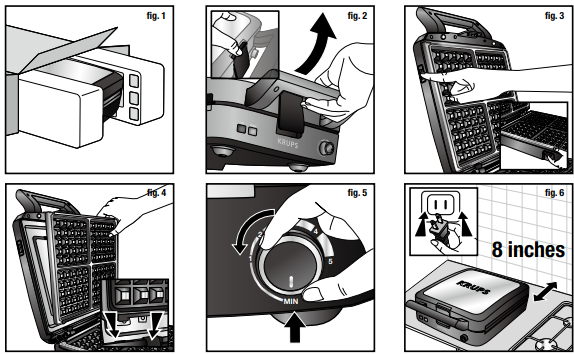
- Open the lid of the waffle maker by depressing the release latch located on the underside of the handle and lifting it.
- To remove waffle plates
- Be sure the plates are completely cool.
- Press the upper plate release button (located on the left side of the lid above the indicator lights) with one hand, while removing the plate with the other hand.
- Repeat the process with the lower plates (release button located on the left bottom housing).
- To replace waffle plates
- Insert the waffle plate tabs into the unit and press down. You will hear the plates click into place.
IMPORTANT
The appliance might generate a slight odor or smoke the first time it is used; this is normal.
OPERATION
- Make sure the plates are in place and the selector knob is turned to the OFF position. Plug in the waffle maker.
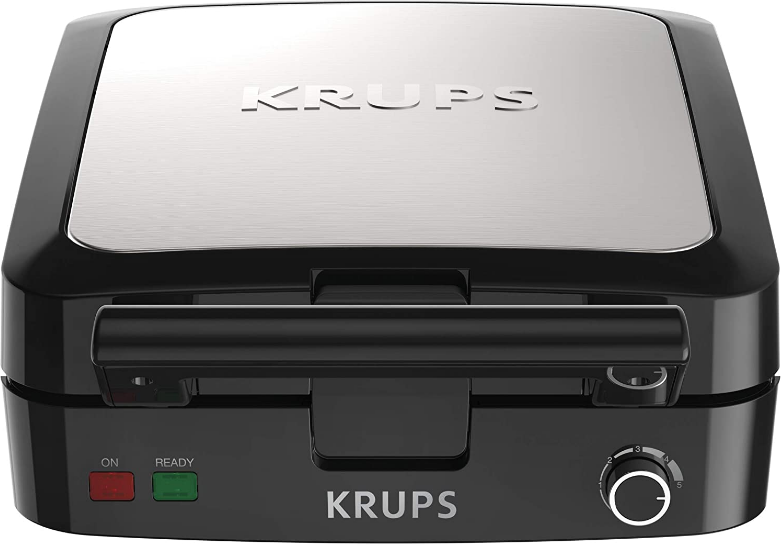
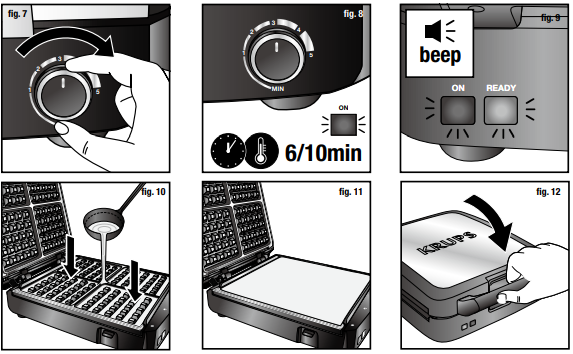
- Turn on the heater and begin preheating by selecting the desired setting with the Selector Knob (Setting 1 will results in the lightest waffle; setting 5 is the darkest). Pre-heat the waffle maker in the closed position.
- The red ON indicator will “light up”. To indicate that the waffle maker is on and heating.
NOTE: The Removable Plates have a non-stick cooking surface that may emit a slight odor during first use. This is normal and commonly occurs with non-stick coatings.
- The red ON indicator will “light up”. To indicate that the waffle maker is on and heating.
- When the waffle maker has reached the selected temperature and is ready to use, the green READY indicator will “light up” and the audible tone will sound
- Lift the lid and add batter. Then close the lid again to cook.
- When your waffles are ready, the audible tone will sound and the READY indicator will “light up” again.
- Carefully remove your waffles and enjoy.
- If making more than one batch of waffles, once your first batch is removed – repeat the baking process by adding more batter (step 3a).
- To turn off your waffle maker at any time, turn the selector knob to the OFF position.
TROUBLESHOOTING
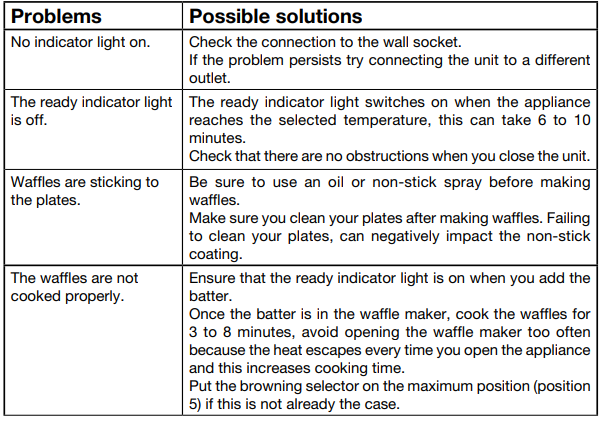

Is your appliance still not working? Please contact an authorized service center (see the list in the service booklet).
CLEANING & MAINTENANCE
- When you are finished cooking, turn the temperature knob Off and unplug the power cord. Allow the unit to cool down completely before handling.
- Press the plate release buttons to remove plates from the housing. Be sure that the plates have cooled completely before handling.
- We recommend cleaning the plates after every use. The plate should be washed in warm soapy water or a dishwasher. Failing to do so may negatively impact the non-stick coating performance. Never use an abrasive cleanser or harsh pad on the non-stick coating.
- To clean the exterior, wipe with a soft dry cloth.
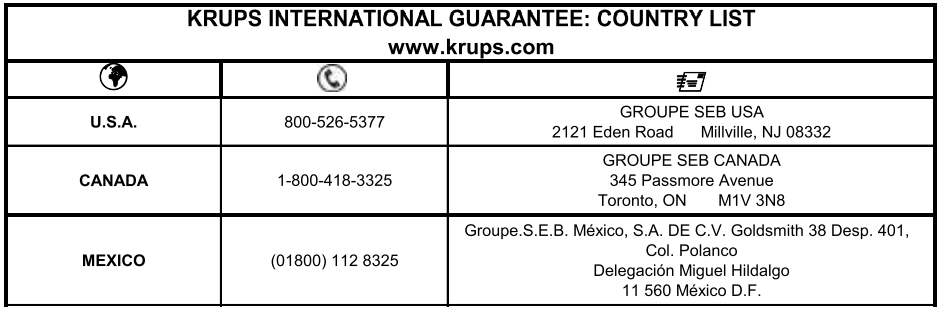
KRUPS INTERNATIONAL LIMITED GUARANTEE
www.krups.com
This product is repairable by KRUPS during and after the guarantee period. Accessories, consumables, and end-user replaceable parts can be purchased, if locally available, as described on the KRUPS internet site www.krups.com
The Guarantee:
This product is guaranteed by KRUPS (company address and details included in the country list of the KRUPS International Guarantee) against any manufacturing defect in materials or workmanship for 2 years starting from the initial date of purchase or delivery date. The international manufacturer’s guarantee by KRUPS is an extra benefit that does not affect consumers’ Statutory Rights.
The international manufacturer’s guarantee covers all costs related to restoring the proven defective product so that it conforms to its original specifications, through the repair or replacement of any defective part and the necessary labor. At KRUPS’s choice, an equivalent or superior replacement product may be provided instead of repairing a defective product.
KRUPS’s sole obligation and your exclusive resolution under this guarantee are limited to such repair or replacement.
Conditions & Exclusions:
The international KRUPS guarantee only applies within the guarantee period and for those countries listed in the country list attached and is valid only on the presentation of proof of purchase.
The product can be taken directly in person to an authorized service center or must be adequately packaged and returned, by recorded delivery (or an equivalent method of postage), to a KRUPS authorized service center. Full address details for each country’s authorized service centers are listed on the KRUPS website (www.krups.com) or by calling the appropriate telephone number as set out in the country list to request the appropriate postal address.
KRUPS shall not be obliged to repair or replace any product which is not accompanied by a valid proof of purchase.
This guarantee will not cover any damage that occurs as a result of misuse, negligence, failure to follow KRUPS instructions, use of current or voltage other than as stamped on the product, or a modification or unauthorized repair of the product. It also does not cover normal wear and tear, maintenance or replacement of consumable parts, or the following:
- using the wrong type of water or consumable
- damage as a result of lightning or power surges
- scaling (any de-scaling must be carried out according to the instructions for use)
- damages or poor results due to wrong voltage or frequency
- professional or commercial use
- ingress of water, dust, or insects into the product (excluding appliances with features specifically designed for insects)
- mechanical damages, overloading
- accidents including fire, flood, thunderbolt, etc
- damage to any glass or porcelain ware in the product
Consumer Statutory Rights:
This international KRUPS guarantee does not affect the statutory rights a consumer may have or those rights that cannot be excluded or limited, nor rights against the retailer from which the consumer purchased the product. This guarantee gives a consumer specific legal rights, and the consumer may also have other legal rights that vary from State to State or Country to Country. The consumer may assert any such rights at his sole discretion.
For Australia only:
Our goods come with guarantees that cannot be excluded under the Australian Consumer Law. You are entitled to a replacement or refund for a major failure and compensation for any other reasonably foreseeable loss or damage. You are also entitled to have the goods repaired or replaced if the goods fail to be of acceptable quality and the failure does not amount to a major failure. Please keep this document for your reference should you wish to claim the guarantee.
FAQs About Krups Breakfast Set Stainless Steel Waffle Maker
How do you know when a Krups waffle maker is done?
Red and green lights on, ready and finished; old plates with non-stick coating for removing the waffle easily and fast cleaning. There are five customizable browning stages, ranging from light toast to deep brown.
How do you clean a Krups waffle iron?
You can use a sponge and your regular dishwashing liquid to clean the plates and the appliance’s body. Avoid using abrasive powder or scouring pads. Never submerge the cord or gadget in water.
Is Krups a good brand for waffle makers?
This machine lives up to the reputation of Krups as a high-quality brand. Additionally, I found a flash half-off deal, which validated my purchase. PROS: Detachable, nonstick cooking plates. Waffles that are fully baked slide out easily, so I didn’t even need to spray them with oil.
How long should you cook waffles in a waffle maker?
As directed by the manufacturer, preheat a waffle maker, lightly coat the surface with a small amount of oil, and then pour in enough batter to barely cover it. Cook the waffles for the recommended amount of time (typically 5 to 6 minutes) or until they are crisp and golden brown.
How to know when a waffle maker is done?
Waffle makers usually take four to six minutes to cook a waffle through, but if yours doesn’t have an indicator light, wait for the waffle to be fully cooked, or remove it when the steam from the iron stops rising.
How much batter to put in a waffle maker?
For uniformly shaped waffles, ensure that the batter is poured into the center of the lower grid and evenly distributed using a heatproof spatula. Use 3/4 cup batter or enough to cover the entire lower grid, for the greatest results.
When to flip a waffle maker?
They function as follows: The batter spreads and cooks on the bottom plates of the waffle maker as soon as it is poured upon it. For the batter to pour onto the top plates, you must then turn the machine over and enable direct contact. By doing this, the waffle will cook more quickly and brown on both sides equally.
Can you wash a waffle maker in the sink?
When your waffle maker is cool enough, use a gentle, moist towel to clean the outside. Take the plates out and give them a wash in the sink if you have a larger waffle mess to cope with.
How do I know when my Krups waffle maker is done?
Red and green lights indicate that the waffle is ready and completed; non-stick-coated old plates allow for quick and easy waffle removal and cleaning. There are five customizable browning stages, ranging from light toast to deep brown.
How much batter do you put in a Krups waffle maker?
Mix into batter. Spoon and distribute approximately half a cup of batter into each square of the bottom plate when the “Ready” light is on and the signal sounds. Shut the lid and secure it.
How long does to leave the waffle in the iron?
Depending on your waffle machine and batter quantity, cook times vary. A waffle cooked fully in a waffle machine usually takes 4-6 minutes. Make sure you refer to your handbook for detailed instructions.
What is Krups known for?
Robert Krups, its originator, is honored in the name. The company manufactures a wide range of home appliances, including food processors, waffle makers, egg cookers, toasters, blenders, kettles, and coffee makers.

