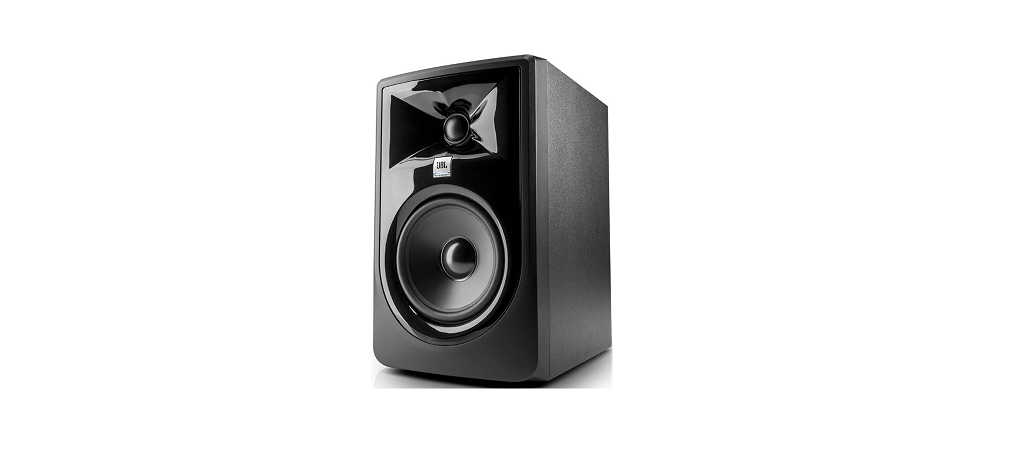
JBL Professional 305P MkII Powered Studio Monitor
INTRODUCTION
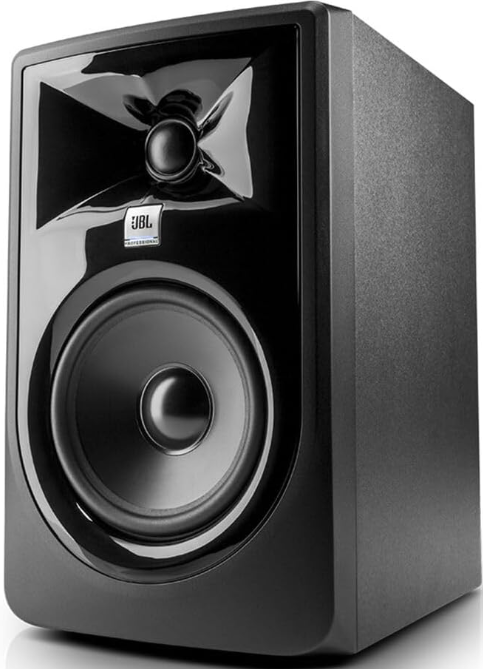
Congratulations on your purchase of JBL Professional 3 Series Studio Monitors. The 3 Series meets JBL’s high standards for accuracy and long-term reliability in demanding professional applications. All 3 Series models incorporate JBL Professional transducer and network technologies to provide accurate frequency response, exceptional low-frequency extension, and high SPL capability.
JBL Linear Spatial Reference (LSR) design ensures greater accuracy at the mix position in acoustically varied workspaces and production environments. Additionally, each speaker is equipped to interface with a range of signal sources, including high-output professional audio equipment.
Thank you for your purchase of JBL 3 Series Studio Monitors
To receive important information as it becomes available, please take a moment to register your 3 Series speakers at registration.
Important Safety Instructions
- READ these instructions.
- KEEP these instructions.
- HEED all warnings.
- FOLLOW all instructions.
- DO NOT use this apparatus near water.
- CLEAN ONLY with a dry cloth.
- DO NOT block any ventilation openings. Install by the manufacturer’s instructions.
- DO NOT install near any heat sources such as radiators, heat registers, stoves, or other apparatus (including amplifiers) that produce heat.
- DO NOT defeat the safety purpose of the polarized or grounding-type plug. A polarized plug has two blades one wider than the other. A grounding-type plug has two blades and a third grounding prong. The wider blade or the third prong is provided for your safety. If the provided plug does not fit into your outlet, consult an electrician for the replacement of the obsolete outlet.
- PROTECT the power cord from being walked on or pinched, particularly at plugs, convenience receptacles, and the point where they exit from the apparatus.
Setting Up Your System
EACH 3-SERIES CARTON INCLUDES THE FOLLOWING ITEMS:
- One 3 Series MkII studio monitor or 3 Series subwoofer
- One power cord
- Quick setup guide
- Four peel-off rubber pads (305P, 306P, and 308P MkII models only)
UNPACKING
When removing a speaker from its packaging, we recommend the following procedure, which will prevent damage to the high-frequency transducer: 305P, 306P, and 308P MkII models:
- Remove the outer shipping carton, if one exists.
- Place the inner carton on the floor with the top facing upwards.
- Open the top of the box.
- Without removing the internal packaging end cap, gently rotate the carton so the open end rests on the floor and the bottom of the carton is facing you.
- Gently lift the carton and allow the speaker and protective end cap to slide out of the carton and remain on the floor.
- Save the cartons and use the above procedure in reverse when you want to repack the units for shipment.
PLACEMENT
3 Series MkII Studio Monitors are designed to deliver exceptional imaging in any room. To get the most out of your speakers, follow these recommendations:
- Locate the four self-adhesive rubber pads supplied with the 305P, 306P, and 308P MkII speakers. Position and attach these to the bottom surface of the speaker close to each corner.
- Position each 305P, 306P, or 308P MkII Studio Monitor in a vertical orientation with the tweeter on top. Vertical orientation eliminates phase shift and acoustic cancellation of frequencies that can occur when the distance of the woofer to the ear is different from the distance of the tweeter to the ear.
- Angle the speakers so the high-frequency transducer in each speaker is aimed directly towards the ear of the listener.
LSR310S subwoofer placement: The low-frequency driver of the LSR310S is mounted on the bottom panel of the subwoofer. Before placing the subwoofer, make sure the position on the floor is free of any large objects that can interfere with or damage the woofer.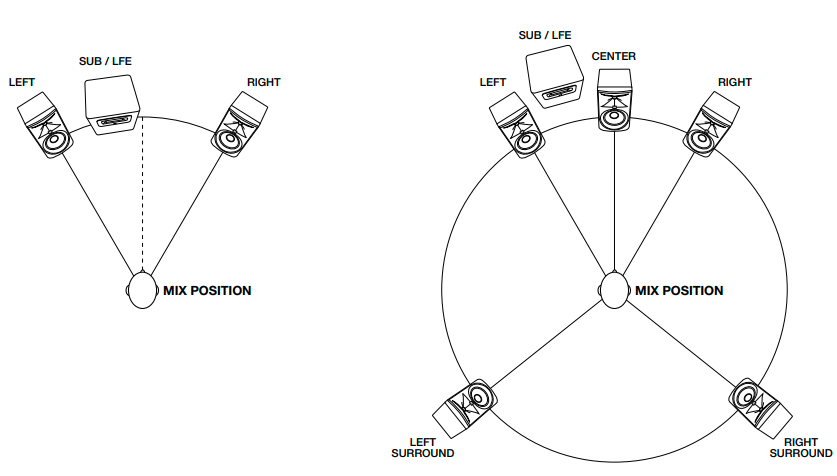
AUDIO CONNECTIONS
NOTE: Before making audio connections, ensure the VOLUME control on each 3 Series speaker/subwoofer is set to the full counter-clockwise (minimum) position.
The 3 Series speakers are equipped with balanced XLR and 6mm (¼”) TRS inputs for connection to professional computer audio interfaces, mixing consoles, and audio production equipment, as well as unbalanced consumer audio products such as personal music players, consumer audio receivers, and audiovisual equipment.
Connect professional equipment with balanced outputs to the XLR or 6mm (¼”) TRS input of the speaker using balanced audio cables.
- When connecting 3 Series speakers to professional equipment with a +4dBu nominal output level. To determine the nominal output level of the connected equipment, consult the documentation supplied with the connected equipment.
- The sound is distorted, even when the speaker VOLUME controls are set to minimum settings
MAKING SOUND
- Ensure the VOLUME control on each 3 Series speaker/subwoofer is set to the full counter-clockwise (minimum) position.
- Power on the connected audio equipment (mixing console, computer audio interface, preamp, etc.).
- Set the POWER switch on each 3 Series speaker/subwoofer to the ON position. After a short delay, the POWER LED on the front of each speaker will illuminate and the speakers will be ready to reproduce audio signals.
- Play full-range program material from the source with ample low-frequency content so that you can properly judge the bass response of the system. Now slowly advance the volume control of the source device until its nominal operating level is achieved.
- Slowly increase the VOLUME control on each 3 Series Studio Monitor until the desired listening level is achieved and all speakers are matched in output level to achieve a balanced image.
- Balance the subwoofer in the system using the rear panel VOLUME control. An additional balance of bass can be achieved by changing the placement of the subwoofer in the room.
305P, 306P, and 308P MkII Powered Studio Monitors
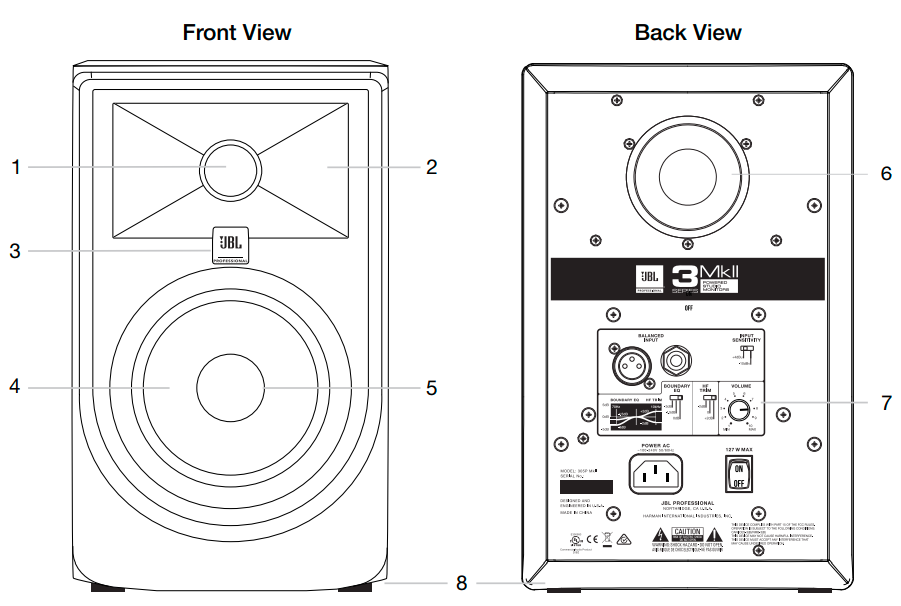
FEATURES
- HIGH-FREQUENCY TRANSDUCER (TWEETER) – This transducer reproduces high-frequency signals.
- WAVEGUIDE – The specially designed JBL Image Control Waveguide enhances imaging and optimizes the blend of direct and reflected sound in the room, ensuring neutral sound at the mix position.
- POWER LED – This LED illuminates when power is connected and the POWER switch is set to ON. Note that after turning the power switch to the ON setting, there is a short delay before the illumination of the LED.
- LOW-FREQUENCY TRANSDUCER (WOOFER) – This transducer reproduces low frequencies.
- DUST DOME – Protects the inner circuit of the woofer. This self-repairing dust dome is resistant to dents caused by fingers and objects.
- LOW-FREQUENCY PORT – The patented Slip Stream™ Port works in conjunction with the low-frequency transducer to provide accurate low-frequency performance.
- INPUT PANEL – This panel includes the power connector, input connectors, and user controls.
- PADS – Four self-adhering pads are supplied with each studio monitor.
INPUT PANEL - XLR INPUT – Connect professional equipment to this connector using a balanced XLR plug.
- 6MM (¼”) INPUT – Connect professional equipment to this connector using a 6mm (¼”) balanced plug. Connect consumer equipment to this connector using a 6mm (¼”) unbalanced plug.
- INPUT SENSITIVITY SWITCH – Set this switch to +4dBu to protect from overload when connecting to professional equipment and sources with high output level capabilities. Set this switch to -10dBV when connecting to lower-level consumer-grade audio equipment or the LSR310S subwoofer.
- BOUNDARY EQ SWITCH – This switch is used to compensate for low-frequency anomalies that may occur when speakers are placed on a work surface or near walls. Settings include 0dB, -1.5dB, and -3 dB. Select the setting that provides the most natural bass response for the application.
- HIGH-FREQUENCY TRIM SWITCH – This switch allows the boost or attenuation of high-frequency output by 2dB. Select the setting that provides the desired high-frequency response for the application.
- VOLUME CONTROL – Use this control to set the maximum listening level.
- POWER RECEPTACLE – Connect the included power cord to this receptacle.
- POWER SWITCH – This switch turns the speaker on or off.
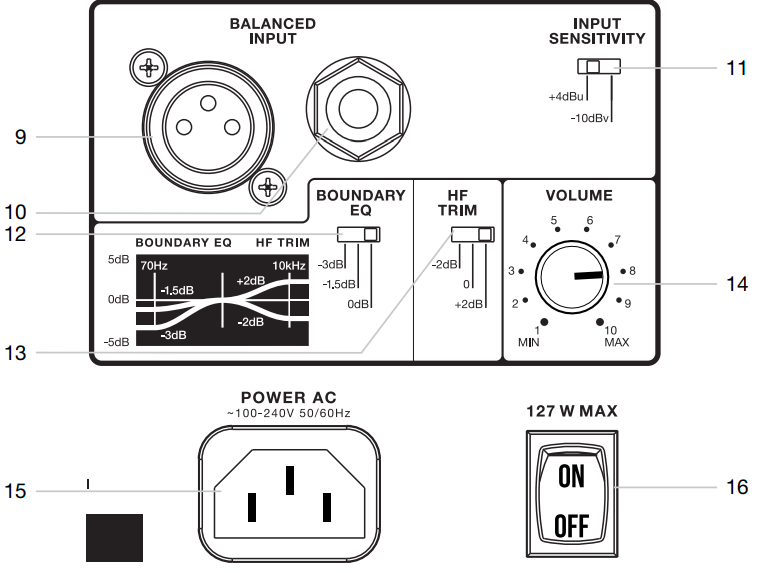
AUDIO CONNECTIONS
Connect signal sources to either the XLR or 6mm (¼”) INPUT connectors. Connect only a single signal source to the speaker using either the XLR INPUT connector OR the 6mm (¼”) TRS INPUT connector. Do not connect signal sources to both input connectors simultaneously.
LSR310S Powered Studio Subwoofer
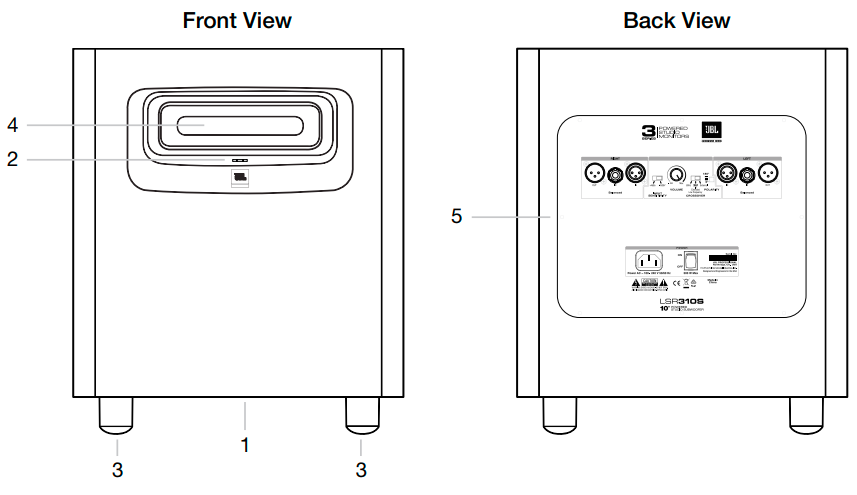
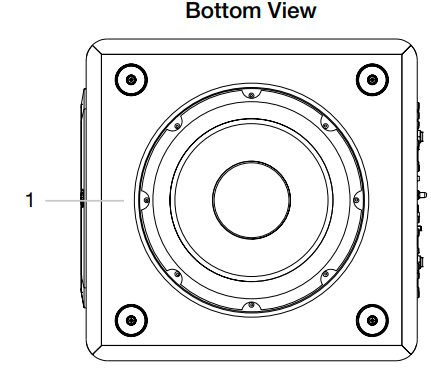
- LOW-FREQUENCY TRANSDUCER (WOOFER) – This transducer reproduces low-frequency signals.
- POWER LED – This LED illuminates when power is connected and the POWER switch is set to ON.
- FEET – These feet elevate the subwoofer to prevent acoustic coupling with the floor.
- LOW-FREQUENCY PORT – This port works in conjunction with the low-frequency transducer to provide accurate low-frequency performance.
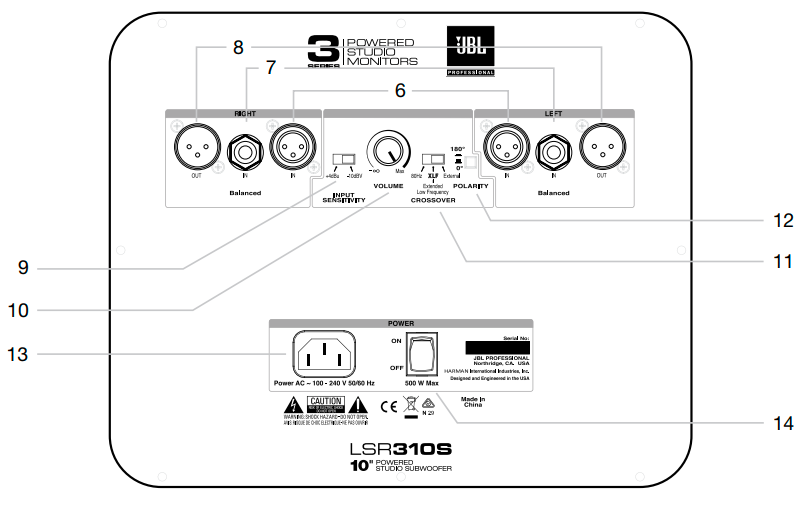
- INPUT PANEL – This panel includes the power connector, input connectors, and user controls.
INPUT PANEL - RIGHT AND LEFT XLR INPUTS – Connect professional equipment to these connectors using balanced XLR plugs.
- RIGHT AND LEFT 6MM (¼”) – Connect professional equipment to these connectors using 6mm (¼”) balanced plugs. Connect consumer equipment to these connectors using 6mm (¼”) unbalanced plugs.
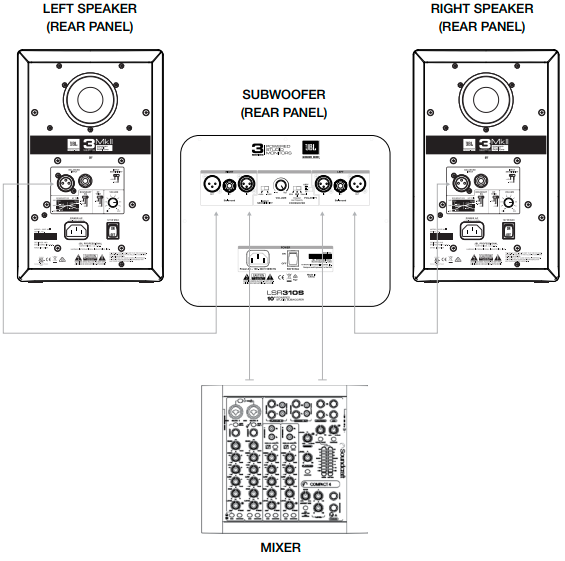
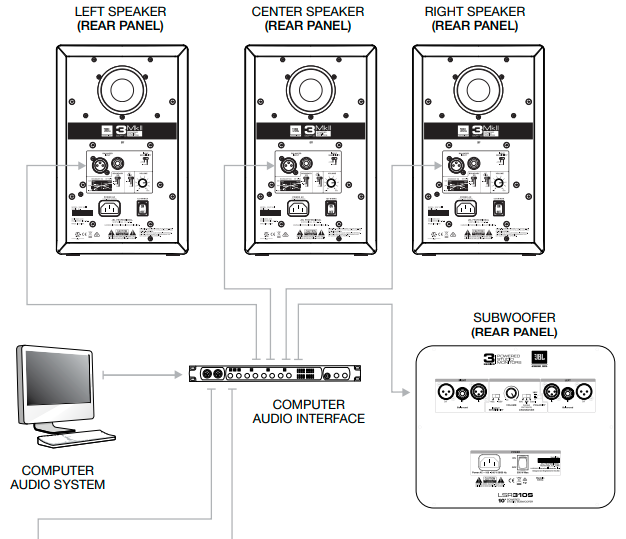
- RIGHT AND LEFT XLR OUTPUTS – Connect these outputs to the 3 Series MkII speakers or other powered speakers or power amplifiers in your monitoring system.
- INPUT SENSITIVITY SWITCH – Set this switch to the +4dBu setting when connecting professional equipment and sources with very high output. Set this switch to -10dBV when connecting to lower-level consumer-grade audio equipment.
- VOLUME CONTROL – Use this control to balance the volume of the subwoofer with the volume of the speakers in the system.
- CROSSOVER FREQUENCY – This crossover provides three settings: 80Hz, XLF, and External. The 80Hz setting is recommended for use with studio monitors, including the 305P, 306P, or 308P MkII. The External setting allows the use of an outboard active crossover. Select the XLF (Extended Low Frequency) setting to activate a circuit that emulates the bass tuning commonly applied to club playback systems.
- POLARITY – Enables optional 180-degree polarity reversal of the subwoofer output to optimize the blend of the subwoofer with the main speakers according to the relative speaker and listening positions. Select the setting that produces the greatest amount of bass when heard in the listening position.
- POWER RECEPTACLE – Connect the included power cord to this receptacle.
- POWER SWITCH – Set this switch to the ON position to operate the subwoofer. Set this switch to the OFF position when the subwoofer is not in use.
System Connections
TWO CHANNEL SYSTEMS
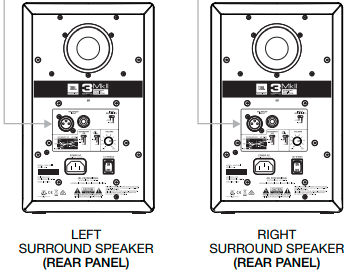
SURROUND SOUND SYSTEMS
Troubleshooting
Issue: There is no sound from the speakers.
- Confirm the power cable is connected to the speaker and the POWER switch is set to the ON position.
- Make sure the POWER LED is illuminated on the front of the speaker.
- Make sure a signal source is connected to the speaker and that it is producing sound.
- Make sure the speaker’s VOLUME control is not set to the full counter-clockwise (minimum) position.
The signal is distorted.
- Verify the speaker’s INPUT SENSITIVITY switch is set to +4dBu. If the distortion persists, even with the speaker’s VOLUME control set low, inspect the gain stages throughout the system to determine which circuit in the signal path is being overdriven.
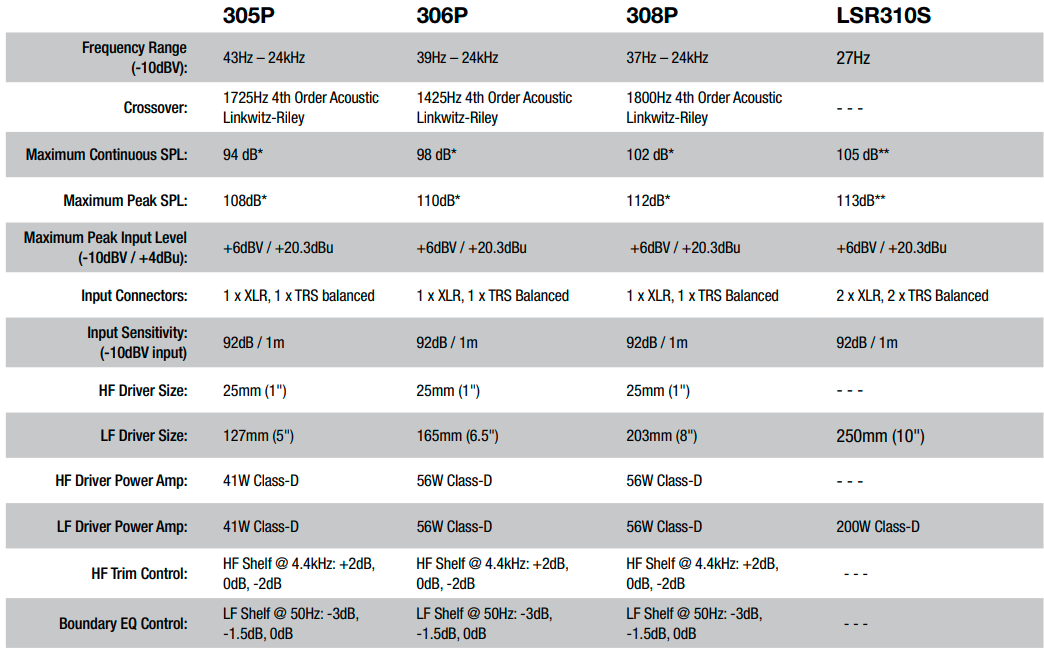
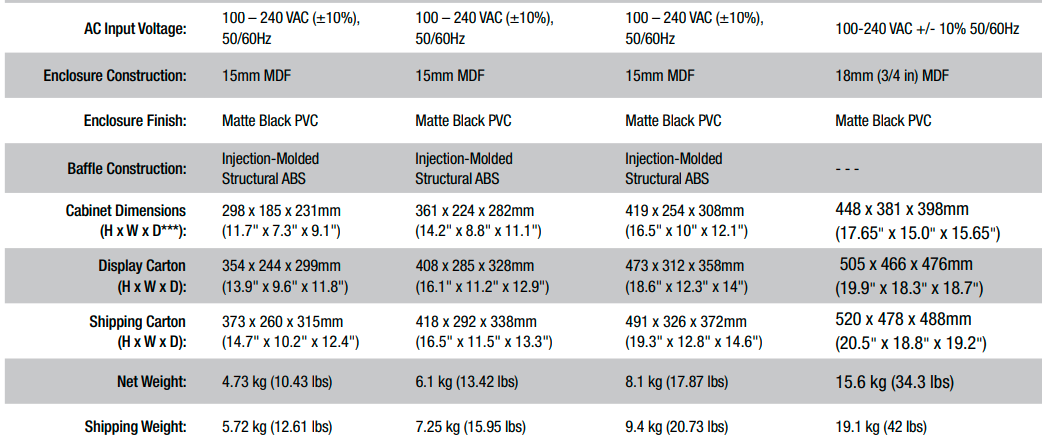
Specifications
JBL Service Contact Information
MAILING ADDRESS:
JBL Professional 8500 Balboa Blvd. Northridge, CA 91329
SHIPPING ADDRESS:
Please contact JBL Professional Customer Service for shipping information before repairs.
CUSTOMER SERVICE:
Monday through Friday
8:00 am – 5:00 pm
Pacific Coast Time in the U.S.A.
(800) 8JBLPRO (800.852.5776)
www.jblproservice.com
PRODUCT REGISTRATION:
Register your product online at registration
ON THE WORLD WIDE WEB:
www.jblpro.com
PROFESSIONAL CONTACTS, OUTSIDE THE USA:
Contact the JBL Professional Distributor in your area. A complete list of JBL Professional international distributors is provided at our U.S.A. website: www.jblpro.com
Product Warranty Information
The JBL Limited Warranty on professional loudspeaker products (except for enclosures) remains in effect for five years from the date of the first consumer purchase. JBL amplifiers are warranted for three years from the date of original purchase.
Enclosures and all other JBL products are warranted for two years from the date of original purchase.
WHO IS PROTECTED BY THIS WARRANTY?
Your JBL Warranty protects the original owner and all subsequent owners so long as A.) Your JBL product has been purchased in the Continental United States, Hawaii, or Alaska. (This Warranty does not apply to JBL products purchased elsewhere except for purchases by military outlets.
Other purchasers should contact the local JBL distributor for warranty information.); and B.) The original dated bill of sale is presented whenever warranty service is required.
WHAT DOES THE JBL WARRANTY COVER?
Except as specified below, your JBL Warranty covers all defects in material and workmanship. The following are not covered: Damage caused by accident, misuse, abuse, product modification, or neglect; damage occurring during shipment; damage resulting from failure to follow instructions contained in your Instruction Manual; damage resulting from the performance of repairs by someone not authorized by JBL; claims based upon any misrepresentations by the seller; any JBL product on which the serial number has been defaced, modified or removed.
FCC STATEMENT
This device complies with part 15 of the FCC Rules. Operation is subject to the following two conditions:
- This device may not cause harmful interference, and
- this device must accept any interference received, including interference that may cause undesired operation.
NOTE: This equipment has been tested and found to comply with the limits for a Class B digital device, under part 15 of the FCC Rules. These limits are designed to provide reasonable protection against harmful interference in a residential installation.
This equipment generates, uses, and can radiate radio frequency energy and, if not installed and used by the instructions, may cause harmful interference to radio communications.
However, there is no guarantee that interference will not occur in a particular installation. If this equipment does cause harmful interference to radio or television reception, which can be determined by turning the equipment off and on, the user is encouraged to try to correct the interference by one or more of the following measures:
- Reorient or relocate the receiving antenna.
- Increase the separation between the equipment and the receiver.
- Connect the equipment to an outlet on a circuit different from that to which the receiver is connected.
- Consult the dealer or an experienced radio/TV technician for help.
JBL Professional
8500 Balboa Boulevard
Northridge, CA 91329 USA
Visit us online at www.jblpro.com
FAQs About JBL Professional 305P MkII Powered Studio Monitor
What is the JBL 305P MkII’s input sensitivity?
With balanced XLR and 1/4″ TRS inputs as well as configurable +4dBu/-10dBV input sensitivity, the 305P MkII provides a range of professional and versatile connectivity options that ensure signal integrity is maintained while setup is simple.
What frequency range does the JBL 305P have?
With a peak SPL of 108 dB, the woofer and tweeter’s combined output provides a frequency response of 49 Hz to 20 kHz.
Do monitors in studios aid in mixing?
To sum up, then: Studio monitors feature a flatter frequency response. This provides a more true-to-life portrayal of their music for the listener. More “separation” between the sounds enables critical mixing and listening.
How can one make a speaker more sensitive?
Raising the sensitivity of a loudspeaker can be achieved by concentrating the available acoustic output into a narrower beam, which can be achieved by decreasing the HF horn(s) dispersion angle, expanding the LF array (double stacking), and/or measuring the speaker in half space (on the ground rather than in free space).
What is the JBL connection’s range?
There are variations in the Bluetooth range. However, while utilizing the device indoors, you should be able to reach up to 15 meters, or slightly under 50 feet. The environment and body mass affect the conditions when using headphones outside.
How do I link my PC to my JBL 305?
Verify whether a 3.5mm audio cable (aux input) is compatible with your JBL speaker. If so, use the aux wire to connect your desktop’s audio output to your JBL speakers, and the speakers ought to function.
What is a studio monitor’s frequency range?
50Hz–20kHz is a suitable frequency response for the majority of recording projects. The total frequency range might not be as important as the monitor’s ability to reproduce every one of those frequencies without distortion or variation, as we’ll talk about a bit later.
What power speakers are rated?
The level at which a speaker is intended to operate continuously is its rated input power. The maximum input power of a speaker is the highest level at which the speaker can maintain sudden peaks (speech or music, for example).
What use does a studio monitor serve?
A loudspeaker made especially for use in professional audio production is called a studio monitor. Precision is the primary distinction between a studio monitor and an entry-level speaker. Sound engineers need studio monitors to pick up on minute nuances in a mix, which is why they are designed to generate a relatively flat frequency.
What is JBL’s low frequency?
The speaker’s low frequency mode, which produces a lot more bass, is activated by default. The speaker produces stronger bass in low frequency mode. Because of this, it is advised that you keep the speaker’s volume below 70% in order to prevent damage.
For More Manuals by JBL, Visit LatestManuals
 |
JBL Professional 305P MkII Powered Studio Monitor User Manual [pdf] |

