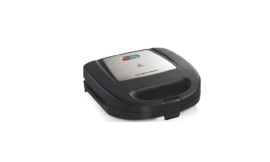
Hamilton Beach Panini Press Sandwich Maker

IMPORTANT SAFEGUARDS
When using electrical appliances, basic safety precautions should always be followed to reduce the risk of fire, electric shock, and/or injury to persons, including the following:
- Read all instructions.
- This appliance is not intended for use by persons (including children) with reduced physical, sensory, or mental capabilities, or lack of experience and knowledge unless they are closely supervised and instructed concerning the use of the appliance by a person responsible for their safety.
- Close supervision is necessary when any appliance is used by or near children. Children should be supervised to ensure that they do not play with the appliance.
- Do not touch hot surfaces. Use handles or knobs.
- To protect against the risk of electrical shock, do not immerse the cord, plug, or cooking unit in water or other liquid.
- Unplug from the outlet when not in use and before cleaning. Allow to cool before putting on or taking off parts and before cleaning. To unplug, grasp the plug and pull from the outlet. Never pull from the power cord.
- Do not operate any appliance with a damaged supply cord or plug, or after the appliance malfunctions or has been dropped or damaged in any manner. Supply cord replacement and repairs must be conducted by the manufacturer, its service agent, or similarly qualified persons to avoid a hazard. Call the provided customer service number for examination, repair, or adjustment information.
- Accessory attachments not recommended by the appliance manufacturer may cause injuries.
- Do not use outdoors.
- Do not let the cord hang over the edge of the table or counter or touch hot surfaces, including the stove.
- Do not place on or near a hot gas or electric burner, or in a heated oven.
- Extreme caution must be used when moving an appliance containing hot oil or other hot liquids.
- Do not use the appliance for other than intended use.
- Do not use the appliance unattended.
- During use, provide 4 to 6 inches of air space above, behind, and on both sides for air circulation.
- Never remove the food with any cutting device or other metallic kitchen utensil.
- Always allow the appliance to cool before putting it away, and never wrap the cord around the appliance while it is still hot.
- Do not operate the appliance using an external timer or a separate remote-control system.
- CAUTION: HOT SURFACE. The temperature of accessible surfaces may be high when the appliance is operating.
SAVE THESE INSTRUCTIONS
This appliance is intended for household use only.
WARNING Electrical Shock Hazard: This appliance is provided with either a polarized (one wide blade) or grounded (3-prong) plug to reduce the risk of electric shock. The plug fits only one way into a polarized or grounded outlet. Do not defeat the safety purpose of the plug by modifying the plug in any way or by using an adapter. If the plug does not fit fully into the outlet, reverse the plug. If it still does not fit, have an electrician replace the outlet.
The length of the cord used on this appliance was selected to reduce the hazards of becoming tangled in or tripping over a longer cord. If a longer cord is necessary, an approved extension cord may be used. The electrical rating of the extension cord must be equal to or greater than the rating of the appliance.
If the appliance is of the grounding type, the extension cord should be a grounding-type, 3-wire cord. Care must be taken to arrange the extension cord so that it will not drape over the countertop or tabletop where it can be pulled on by children or accidentally tripped over.
Parts and features
Before First Use: See Step 2 of “Care and Cleaning.”
- Cover
- Cover Lock Knob
- Base
- Nonstick Cooking
Surfaces - Storage Latch
(optional feature on select models) - Green Preheat Light
- Red Power ON Light
How to Use
Burn Hazard: Exterior becomes hot and escaping steam may cause burns. Use an oven mitt when cooking.
- Plug into a wall outlet. The red light will illuminate and remain lit as long as the panini press is plugged in.
- Preheat for 6 minutes with cover closed. The green light will illuminate when the cooking temperature is reached.
- Use an oven mitt to raise the cover. Add food and lower cover. The cover can be locked at the desired height by turning e cover locking knob.
- Unlock the cover to check the food. Do not cut food on a nonstick cooking surface.
- Use a plastic spatula to remove food. Unplug. Let cool before cleaning.
Care and Cleaning
Electrical Shock Hazard. Disconnect power before cleaning. Do not immerse the cord, plug, or base in water or other liquid.
- Unplug and cool. Wipe cooking surfaces with a paper towel to remove drippings. A plastic spatula can be used to remove cooked-on food.
- Use a damp sponge with dish detergent to clean cooking surfaces. Rinse the sponge and wipe surfaces clean. Wipe surfaces again with a clean, damp cloth.
- Do not use steel wool or any type of abrasive cleaner that will damage the nonstick cooking surface.
- Wipe the outside of the panini press with a clean, damp cloth.
Limited warranty
This warranty applies to products purchased and used in the U.S. and Canada. This is the only express warranty for this product and is instead of any other warranty or condition. This product is warranted to be free of defects in material and workmanship for five (5) years from the date of original purchase in Canada and one (1) year from the date of original purchase in the U.S.
During this period, your exclusive remedy is repair or replacement of this product or any component found to be defective, at our option; however, you are responsible for all costs associated with returning the product to us and our returning a product or component under this warranty to you. If the product or component is no longer available, we will replace it with a similar one of equal or greater value.
This warranty does not cover glass, filters, wear from normal use, use not in conformity with the printed directions, or damage to the product resulting from accident, alteration, abuse, or misuse. This warranty extends only to the original consumer purchaser or gift recipient.
Keep the original sales receipt, as proof of purchase is required to make a warranty claim. This warranty is void if the product is used for other than single-family household use or subjected to any voltage and waveform other than as specified on the rating label (e.g., 120V ~ 60 Hz).
We exclude all claims for special, incidental, and consequential damages caused by breach of express or implied warranty. All liability is limited to the amount of the purchase price. Every implied warranty, including any statutory warranty or condition of merchantability or fitness for a particular purpose, is disclaimed except to the extent prohibited by law, in which case such warranty or condition is limited to the duration of this written warranty. This warranty gives you specific legal rights.
You may have other legal rights that vary depending on where you live. Some states or provinces do not allow limitations on implied warranties or special, incidental, or consequential damages, so the foregoing limitations may not apply to you. To make a warranty claim, do not return this appliance to the store. Please call 1.800.851.8900 in the U.S. or 1.800.267.2826 in Canada or visit hamiltonbeach.com in the U.S. or hamiltonbeach.ca in Canada. For faster service, locate the model, type, and series numbers on your appliance.
For More Manuals by Hamilton Beach, Visit the Latest Manuals
FAQs About Hamilton Beach Panini Press Sandwich Maker
How do you use a Hamilton panini press?
Always allow the press to warm for six minutes before using it for optimal results. As the press heats up, prepare a filling supper by topping bread with your preferred cheese, meat, and vegetables. A pre-installed green readiness light will indicate when the sandwich press is prepared to cook.
How long does Hamilton sandwich maker take?
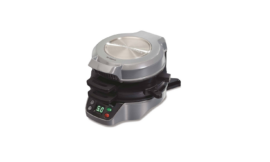
Cook for four minutes. Slide the plate handle to the left. Using a plastic spatula, carefully remove the sandwich after lifting the lid and rings.
How does the Hamilton Beach sandwich maker work?
Just put the egg and the top layers of your sandwiches on the upper frying plates, build the base of your sandwiches in the bottom layer, and then cover. Your breakfast sandwiches will be ready to enjoy in just five minutes.
What is the purpose of a sandwich press?
Although you can use it creatively to prepare and reheat a range of items, a sandwich press is a countertop gadget meant to heat and grill sandwiches. Although it is rather hefty, it is still small and convenient to store when not in use. It usually comes in two or four-slice sizes.
What is the difference between a panini press and a sandwich press?
A panini machine is the best for uniformly distributing heat and searing food until the sandwich surfaces are nicely browned. A sandwich maker, on the other hand, focuses mostly on sealing and toasting the edges, providing a unique flavor and texture.
What is another name for sandwich press?
“Toastie Maker” is merely an alternative term for Sandwich Press. More specifically, jaffle makers are frequently made to fit the dimensions and form of typical bread slices.
Is a sandwich maker good for health?
Using a sandwich maker is healthful since it helps you drain excess oil from the food, leaving it tasty yet nutritional and oil-free.
Is a sandwich maker necessary?
Pressing, squashing, or compressing two bread slices together is the primary function of a sandwich press. Although this kind of work can be completed by hand, there are several reasons why your kitchen needs this kind of equipment. You may press thin bread slices without damaging them if you use the correct sandwich press machine.
Should we preheat the sandwich maker?
Before using the sandwich maker, always preheat it. Make sure the bread fits the Cooking Plates. For each sandwich, use around 1/3 (85 ml) cups of filling. Although buttering the bread is not required, the Cooking Plates should occasionally be lightly seasoned with oil or butter.
How do you use a Hamilton Beach premium bread maker?
Add the ingredients, choose a cycle, and press the start button. 14 Programmable Settings: Prepare dough, bread, and other items for a variety of meals and tastes. Make whole grain, artisan, basic, French, fast, and gluten-free breads. You can make delectable cakes and jams with your bread maker as well.