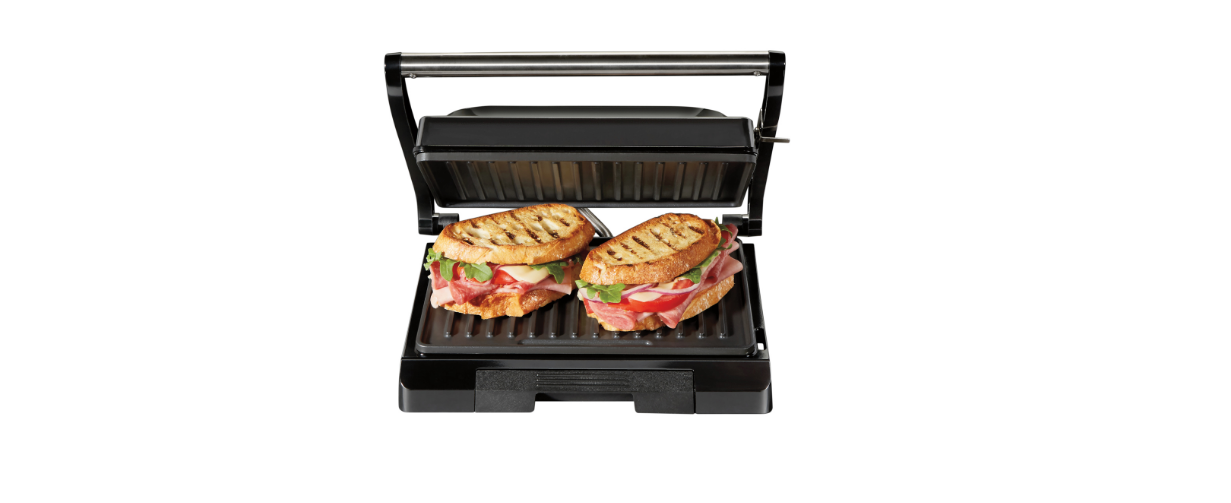
Hamilton Beach Panini Press Sandwich Maker
IMPORTANT SAFEGUARDS
When using electrical appliances, basic safety precautions should always be followed including the following:
- Read all instructions.
- Do not touch hot surfaces. Use handles or knobs.
- To protect against the risk of electrical shock, do not immerse the appliance, cord, or plug in water or other liquid.
- Close supervision is necessary when any appliance is used by or near children.
- Unplug from the outlet when not in use and before cleaning. Allow to cool before putting on or taking off parts, and before cleaning the appliance.
- Do not operate any appliance with a damaged cord or plug, or after the appliance malfunctions or is dropped or damaged in any manner. Call our toll-free customer service number for information on examination, repair, or adjustment.
- Do not use outdoors.
- The use of attachments not recommended or sold by the appliance manufacturer for use with this model may cause fire, electric shock, or injury.
- Do not let the cord hang over the edge of the table or counter or touch hot surfaces, including the stove.
- Do not place on or near a hot gas or electric burner, or in a heated oven.
- Extreme caution must be used when moving an appliance containing hot oil or other hot liquids.
- Do not use the appliance for other than the intended purpose.
Consumer Safety Information
This appliance is intended for household use only.
WARNING! Shock Hazard: This product is provided with either a polarized (one wide blade) or grounded (3-prong) plug to reduce the risk of electric shock. The plug fits only one way into a polarized or grounded outlet. Do not defeat the safety purpose of the plug by modifying the plug in any way or by using an adapter. If the plug does not fit fully into the outlet, reverse the plug. If it still does not fit, have an electrician replace the outlet.
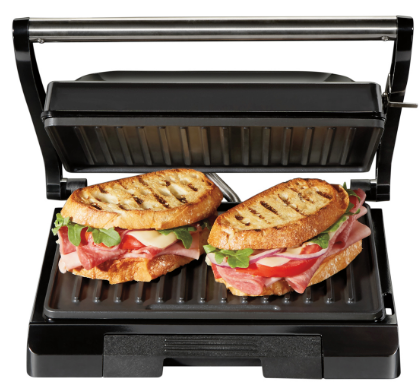
Know Your Panini Press
Parts and Features
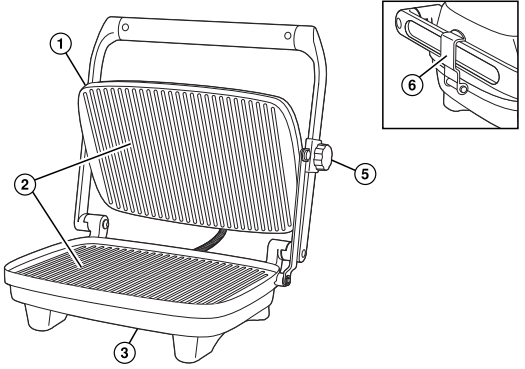
- Cover
- Nonstick Cooking Surfaces
- Base
- Indicator Lights
- Cover Lock
- Storage Latch
Operating Instructions
BEFORE FIRST USE: Wash the cooking surfaces of the panini press as instructed under “Cleaning.”
- Plug into a 120-volt AC outlet.
- Preheat the panini press for 6 minutes. The red light comes on and remains lit as long as the panini press is plugged into an outlet. Once the unit has reached the proper temperature, the green light will come on. Keep the cover closed.
- When preheated, raise the cover. Place food to be cooked onto the cooking surface and lower the cover to the desired height. Lock the cover at the desired height by turning the cover lock, if desired.
WARNING! Burn Hazard. The exterior becomes hot. Use an oven mitt when cooking. - Unlock the cover; then use an oven mitt and carefully lift the cover and check the food to see if cooked to the desired doneness. Do not cut food on a nonstick cooking surface. If additional cooking time is needed, lower the cover.
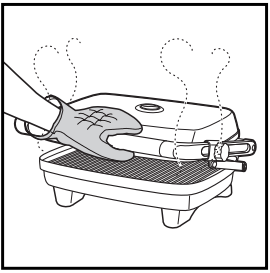 5. When food is cooked to the desired doneness, remove the food and unplug the panini press. Let cool before cleaning.
Panini Press Tips
- ALWAYS PREHEAT THE PANINI PRESS 6 MINUTES BEFORE USING.
- Read the Use and Care Guide before using the panini press.
- Use vegetable cooking spray for convenient, stick-free cooking. Or if you prefer, brush cooking surfaces with vegetable oil before preheating.
- Use plastic utensils on the nonstick cooking surfaces. Do not use metal utensils since they will damage the nonstick surface.
- Thicker sandwiches may shift when being pressed. Use a plastic spatula to repost—the ace and hthe in the center of the press.
- When a recipe calls for fruit, lock the cover in place above the fruit so that it heats but does not contact the fruit.
- There is no need to press down on the handle. The weight of the cover will grill the top of the sandwich.
- Cleanup is easy! Let the panini press cool down. Wipe cooking surfaces with a damp paper towel or dishcloth.
- Do not latch the storage latch with anything between the grids—this could break the storage latch.
Cleaning
- Unplug the panini press from the electrical outlet and allow it to cool.
- Wipe cooking surfaces with a paper towel to remove drippings.
- Use a plastic spatula to scrape away cooked-on food or grease.
- Use a damp sponge with a small amount of dishwashing detergent to scrub cooking surfaces. See illustration. Rinse out the sponge and wipe surfaces clean. Use a clean, damp cloth to wipe surfaces again.
- Do not use steel wool or any type of abrasive cleaner to clean the panini press, since it will damage the nonstick cooking surface and void the warranty.
- Use a clean, damp cloth to wipe clean the outside of the panini press.
- The unit can be stored with the lid latch locked, sitting upright on the hinge side.
Limited Warranty
This warranty applies to products purchased in the U.S. and Canada. This is the only express warranty for this product and is instead of any other warranty or condition. This product is warranted to be free from defects in material and workmanship for one (1) year from the date of original purchase.
During this period, your exclusive remedy is repair or replacement of this product or any component found to be defective, at our option; however, you are responsible for all costs associated with returning the product to us and our returning a product or component under this warranty to you.
If the product or component is no longer available, we will replace it with a similar one of equal or greater value.
This warranty does not cover glass, filters, wear from normal use, use not in conformity with the printed directions, or damage to the product resulting from accident, alteration, abuse, or misuse. This warranty extends only to the original consumer purchaser or gift recipient.
Keep the original sales receipt, as proof of purchase is required to make a warranty claim. This warranty is void if the product is used for other than single-family household use or subjected to any voltage and waveform other than as specified on the rating label (e.g., 120V ~ 60 Hz). We exclude all claims for special, incidental, and consequential damages caused by breach of express or implied warranty. All liability is limited to the amount of the purchase price.
Every implied warranty, including any statutory warranty or condition of merchantability or fitness for a particular purpose, is disclaimed except to the extent prohibited by law, in which case such warranty or condition is limited to the duration of this written warranty.
This warranty gives you specific legal rights. You may have other legal rights that vary depending on where you live. Some states or provinces do not allow limitations on implied warranties or special, incidental, or consequential damages, so the foregoing limitations may not apply to you.
To make a warranty claim, do not return this appliance to the store. Please call 1.800.851.8900 in the U.S. or 1.800.267.2826 in Canada or visit hamiltonbeach.com in the US or hamiltonbeach.ca in Canada. For faster service, locate the model, type, and series numbers on your appliance.
USA: 1.800.851.8900
Visit hamiltonbeach.com for delicious recipes, and tips, and to register your product online!
For More Manuals by Hamilton Beach, Visit the Latest Manuals
FAQs About Hamilton Beach Panini Press Sandwich Maker
How long does Hamilton sandwich maker take?
Cook for four minutes. Slide the plate handle to the left. Using a plastic spatula, carefully remove the sandwich after lifting the lid and rings.
How hot does a panini press get?
More versatility: most panini presses have an adjustable temperature control as standard. The most popular range is between 120 and 570 degrees Fahrenheit, which you can use to either warm tortillas or reach extremely high temperatures for cleaning and seasoning.
How many watts is the Hamilton Beach panini press?
Red Panini Press with Floating Lid, 1400 Watts.
How do you use a Hamilton panini press?
Always allow the press to warm for six minutes before using it for optimal results. As the press heats up, prepare a filling supper by topping bread with your preferred cheese, meat, and vegetables. A pre-installed green readiness light will indicate when the sandwich press is prepared to cook.
How to clean Hamilton Beach panini press?
Take the grill out of the outlet and let it cool. To get rid of drips, use paper towels to clean kitchen surfaces. Use a plastic spatula to remove any grease or food that has cooked on. Scrub kitchen surfaces with a moist sponge and a tiny bit of dishwashing soap.
How do you clean a Hamilton sandwich maker?
Making Hamilton Beach clean Well done Breakfast sandwich maker is also a simple concept to think of. The sandwich-making rings can be released by lifting the cover. You may either hand wash them in hot, soapy water or put them in the dishwasher.
Is panini hot or cold?
Try your hand at creating a panini at home; they taste great both hot and cold. To make the sandwich crispier, try brushing the outside of the bread with some olive oil or butter if you like your paninis hot.
Does a panini press use a lot of electricity?
The panini press is a high energy user, directly connected to its speed. Still, the best ones are always designed to consume as little as possible and come with energy-saving modes (which is good for the pocket too).
Do you use oil on a panini press?
Season your panini grill: This will prevent rust and food from sticking to the grill. After cleaning and drying your panini grill thoroughly after using it for the first time, lightly coat the cast-iron plates with cooking oil and preheat to the highest temperature.
Does a panini press smoke?
Your sandwich maker may emit smoke if there are food particles or fat residue trapped between the plates. Would you kindly clean the plates and check if it resolves the problem?

