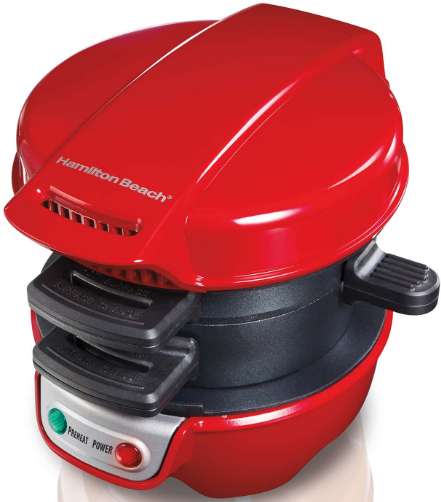
Hamilton Beach 25476 Breakfast Sandwich Maker

IMPORTANT SAFEGUARDS
When using electrical appliances, basic safety precautions should always be followed to reduce the risk of fire, electric shock, and/or injury to persons, including the following:
- Read all instructions.
- This appliance is not intended for use by persons (including children) with reduced physical, sensory, or mental capabilities, or lack of experience and knowledge unless they are closely supervised and instructed concerning the use of the appliance by a person responsible for their safety.
- Close supervision is necessary when any appliance is used by or near children. Cleaning and user maintenance shall not be made by children unless they are supervised. Children should be supervised to ensure that they do not play with the appliance.
- To protect against the risk of electrical shock, do not immerse the cord, plug, or any part of the appliance in water or other liquid.
- Unplug from the outlet when not in use and before cleaning. Allow to cool before cleaning. Allow to cool before putting on or taking off parts, or moving the appliance. To unplug, grasp the plug and pull from the outlet. Never pull from the power cord.
- Do not operate any appliance with a damaged supply cord or plug, or after the appliance malfunctions or has been dropped or damaged in any manner. Supply cord replacement and repairs must be conducted by the manufacturer, its service agent, or similarly qualified persons to avoid a hazard. Contact Customer Service for information on examination, repair, or adjustment as outlined in the Limited Warranty.
- Do not place on or near a hot gas or electric burner or in a heated oven.
- Do not let the cord hang over the edge of the table or counter or touch hot surfaces, including the stove.
- Do not use outdoors.
- Do not use the appliance for other than the intended purpose.
- Do not touch hot surfaces. Use handles or knobs.
- Do not operate the appliance using an external timer or a separate remote-control system.
- Do not leave the appliance unattended while the appliance is connected to an electrical outlet.
- Extreme caution must be used when moving an appliance containing hot oil or other hot liquids.
- The use of accessory attachments not recommended by the appliance manufacturer may cause injuries.
- To disconnect, turn all controls to OFF; then remove the plug from the wall outlet. To unplug, grasp the plug and pull from the outlet. Never pull from the power cord.
- Place the appliance only on a dry, level, and nonflammable surface.
- During use, provide 4 to 6 inches of air space above, behind, and on both sides for air circulation. Do not use it on surfaces where heat may cause a problem.
- Never remove food with any kind of cutting device or other metallic kitchen utensil.
- Always allow the appliance to cool down completely before putting it away. Never wind the cord around the appliance while it is still hot.
- CAUTION: HOT SURFACE. The temperature of accessible surfaces may be high during and after operation.
SAVE THESE INSTRUCTIONS
Other Consumer Safety Information
This appliance is intended for household use only.
WARNING Electrical Shock Hazard: This product is provided with either a polarized (one wide blade) or grounded (3-prong) plug to reduce the risk of electric shock. The plug fits only one way into a polarized or grounded outlet. Do not defeat the safety purpose of the plug by modifying the plug in any way or by using an adapter. If the plug does not fit fully into the outlet, reverse the plug. If it still does not fit, have an electrician replace the outlet.
The length of the cord used on this appliance was selected to reduce the hazards of becoming tangled in or tripping over a longer cord. If a longer cord is necessary, an approved extension cord may be used. The electrical rating of the extension cord must be equal to or greater than the rating of the appliance.
If the appliance is of the grounding type, the extension cord should be a grounding-type, 3-wire cord. Care must be taken to arrange the extension cord so that it will not drape over the countertop or tabletop where it can be pulled on by children or accidentally tripped over.
To avoid an electrical circuit overload, do not use another high-wattage appliance on the same circuit with this appliance. If using an extension cord, it should be connected to the unit’s power cord before it is plugged into the outlet. In the case of a power failure, the same procedure should be followed.
Parts and Features
- Cover
- Cooking Plate
- Cooking Plate Handle
- Base
- Indicator Lights
- Bottom Heating Plate
- Removable Ring Assembly
- Top Heating Plate
- Green PREHEAT Light
- Red POWER Light
Before first use: Lift the Cover to remove the Ring Assembly. Wash the Removable Ring Assembly in the dishwasher or hot, soapy water. Rinse and dry. Wipe the Top and Bottom Heating Plates with a damp, soapy cloth. Remove soap with a damp cloth; dry thoroughly. Spray Rings with nonstick cooking spray, or wipe or brush with vegetable oil.
How to Use
Burn Hazard. Always use an oven mitt to protect your hand when opening the cover. Hot surfaces and escaping steam can burn.
- Plug into an outlet. Red POWER Light will glow. Lightly spray Rings with nonstick cooking spray before each use.
- Let the unit preheat with the Cover closed and the Cooking Plate in the between the Rings.
NOTE: Green PREHEAT Light will come on when the unit is heated to the correct temperature and will cycle on and off during cooking. It is NOT an indicator of when the sandwich is ready. The red POWER Light stays on. - Use Handles to lift the Cover, top ring, and Cooking Plate.
- Place the bottom half of the bread (such as an English muffin, small bagel, or biscuit) onto the Bottom Heating Plate.
- Top bread with ingredients such as precooked meats, vegetables, and cheese. Do not overfill the Breakfast Sandwich Maker. Overfilling will cause food to spill over Rings and get stuck in the Hinges.
- Move the top ring and Cooking Plate down. Make sure the Cooking Plate is rotated securely to the back of the Ring as far as it will go to prevent the leaking of the egg.
- Crack an egg onto the Cooking Plate. Pierce the yolk with a fork or toothpick. (You can use a whole large egg, egg white, or a scrambled egg.)
- Top with the other the half of bread.
- Close Cover. Cook the sandwich for 4 to 5 minutes.
NOTE: Do not push the Cover down when loaded with ingredients or when using a jumbo egg. The cover may rise as the scrambled egg cooks. - When finished cooking, rotate the Cooking Plate Handle clockwise until it stops.
- Using an oven mitt, lift the Ring Assembly and Cover it with the old bottom Handle open. Some sandwiches are easier to remove if Rings are lifted individually.
- Remove the breakfast sandwich with plastic or wooden utensils. Never use metal. Always wait 2 minutes between cooking sandwiches to ensure the Breakfast Sandwich Maker is heated to the correct temperature.
- Unplug. Allow to cool.
TIPS
- Get your ingredients together before cooking your sandwich.
- Always keep the Cove closed with Rings and the Cooking Plate in place when preheating.
- Check to make sure Cooking Plate is in place before preheating, and when adding food.
Care and Cleaning
Electrical Shock Hazard. Disconnect power before cleaning. Do not immerse the cord, plug, or base in any liquid.
- Unplug. Allow to cool.
- To remove the Ring Assembly for cleaning, hold the bottom Handle to open, and then lift it straight up.
- Wash the Removable Ring Assembly in the top rack only of the dishwasher or in hot, soapy water. Rinse and dry. Do not use steel wool, scouring pads, or abrasive cleansers on any part of the unit. Never use sharp or pointed objects for cleaning.
- DO NOT use the “SANI” setting when washing in the dishwasher. “SANI” cycle temperatures could damage your product.
- Wipe the Top and Bottom Heating Plates with a damp, soapy cloth. Remove soap with a damp cloth; dry thoroughly.
- To replace the Ring Assembly, align tabs on the Ring Assembly with openings on the hinge of the Base, and lower.
- Wipe the outside of the unit with a damp cloth.
Troubleshooting
Low, poor, or slow heating.
- The breakfast Sandwich Maker wasn’t preheated until the PREHEAT Light was illuminated. The green PREHEAT Light will come on in about 5 to 7 minutes indicating the unit is heated to the correct temperature. Light will cycle and does not indicate sandwich is ready.
- Allow 2 minutes between making sandwiches for the Breakfast Sandwich Makertheheat to the correct temperature.
- Overfilled. Reduce the amount of ingredients in your sandwich.
- Unit needs to be preheated with Cover closed with Rings and Cooking Plate in place.
- Make sure the Cooking Plate is rotated securely to the back of the Ring as far as it will go, to prevent the leaking of the egg, and the cover is closed when preheating.
Egg undercooked, bread not done
- Extra large eggs, frozen, or very cold ingredients may lengthen cooking time. Add additional cooking time.
Egg overcooked
- Cooking time is about 5 minutes. Cooking time may vary if you are using small eggs, scrambled or egg whites. Reduce cooking time for future recipes.
Ingredients stick to Rings or nonstick Cooking Plate
- Use a plastic or wooden utensil to loosen any baked-on ingredients. Lightly spray with nonstick cooking spray before preheating for next use.
Eggs leak out of Rings
- The unit is overfilled. Only use large eggs and reduce the amount or size of ingredients. Do not press down on the Cover.
- The cooking Plate may not have been in the correct position. Make sure the Cooking Plate is rotated securely to the back of the Ring as far as it will go to prevent the leaking of the gg.
- Used very thin purchased egg whites. Use fresh egg whites or try a different brand of egg whites.
The cover rises when cooking my sandwich
- Air whisked into a large scrambled egg may cause the cover to rise while the egg is cooking. Do not press down on the Cover.
Bread too brown
- Higher fat contents and sugars may cause bread to darken. Cook egg for several minutes without bread and Cover down. Then add bread to finish cooking your sandwich.
Limited Warranty
This warranty applies to products purchased and used in the U.S. and Canada. This is the only express warranty for this product and is instead of any other warranty or condition. This product is warranted to be free from defects in material and workmanship for five (5) years from the date of original purchase in Canada and one (1) year from the date of original purchase in the U.S.
During this period, your exclusive remedy is the replacement of this product or any component found to be defective, at our option; however, you are responsible for all costs associated with our returning a product or component under this warranty to you.
If the product or component is unavailable, we will replace it with a similar one of equal or greater value. This warranty does not cover glass, filters, wear from normal use, use not in conformity with the printed directions, or damage to the product resulting from accident, alteration, abuse, or misuse. This warranty extends only to the original consumer purchaser or gift recipient. Keep the original sales receipt, as proof of purchase is required to make a warranty claim. This warranty is void if the product is used for other than single-family household use or subjected to any voltage and waveform other than as specified on the rating label (e.g., 120 V ~ 60 Hz). We exclude all claims for special, incidental, and consequential damages caused by breach of express or implied warranty.
All liability is limited to the amount of the purchase price. Every implied warranty, including any statutory warranty or condition of merchantability or fitness for a particular purpose, is disclaimed except to the extent prohibited by law, in which case such warranty or condition is limited to the duration of this written warranty.
This warranty gives you specific legal rights. You may have other legal rights that vary depending on where you live. Some states or provinces do not allow limitations on implied warranties or special, incidental, or consequential damages, so the foregoing limitations may not apply to you. To make a warranty claim, do not return this appliance to the store.
Please write Hamilton Beach Brands, Inc., Customer Service Department, 4421 Waterfront Dr., Glen Allen, VA 23060, or visit hamiltonbeach.com/customer-service in the U.S. or hamiltonbeach.ca/customer-service in Canada. For faster service, locate the model, type, and series numbers on your appliance.
For More Manuals by Hamilton Beach, Visit the Latest Manuals
FAQs About Hamilton Beach 25476 Breakfast Sandwich Maker
The Hamilton Beach breakfast sandwich maker asks how long to cook.
In less than five minutes, you can have a hot, freshly cooked breakfast sandwich with the Hamilton Beach Breakfast Sandwich Maker.
How is the sandwich maker made by Hamilton Beach operated?
Every sandwich is made to order according to personal preferences, so everyone can have their favorite. Just put the egg and the top layers of your sandwiches on the upper frying plates, build the base of your sandwiches in the bottom layer, and then cover. Your breakfast sandwiches will be ready to enjoy in just five minutes.
How is the sandwich maker made by Hamilton Beach cleaned?
Disposable ring assembly should be cleaned in hot, soapy water or dishwasher. After rinsing, dry. Using a wet cloth dipped in soap, clean the top and bottom heating plates. Using a moist cloth, remove the soap and thoroughly dry.
Can biscuits be used in the breakfast sandwich machine made by Hamilton Beach?
Before the green PREHEAT light appears, preheat the breakfast sandwich maker. Raise the cooking plate, cover, and top ring. Put the bottom half of the biscuit, cut side up, inside the Breakfast Sandwich Maker’s bottom ring. Add cheese, sausage,, and red pepper on top.
In Hamilton Beach, how long do eggs take to cook?
Flip on the (|) switch. There will be a red light on. The cooking time of eggs is 6 to 8 minutes.
How long should a breakfast sandwich be heated?
Microwave on defrost (or 50% power) for 40 to 1 minute. After turning the sandwich over, reheat it in the microwave for 10 to 30 seconds on high power. The sandwiches can also be reheated in a toaster oven or an oven set to 350 degrees for ten to fifteen minutes.
Can you wash a sandwich maker?
Use a damp towel to clean the outside of your sandwich or panini maker. The plates can be cleaned by doing the following with a damp cloth or a gentle sponge: Please remember not to submerge the device in water.
Is washing the sandwich maker okay?
After using a moist cloth to wipe the exterior, let it dry. If needed, use soapy water to wipe the toasting plates with a moist cloth before completely drying them. Abrasive cleansers should not be used since they will harm the non-stick coating. To keep the sandwich toaster in good operating order, clean it after each usage.
What is the duration of a Sandwich Maker?
Once the lid is closed, heat for around 4–5 minutes, or until the food is cooked and browned. 5. Turn off your sandwich toaster and take the toast out with care.
How long do breakfast sandwiches take to cook in Hamilton?
Cook for four to five minutes. The cooking plate can be slid out by turning the handle clockwise. With a plastic spatula, carefully remove the sandwich after lifting the lid and rings.


