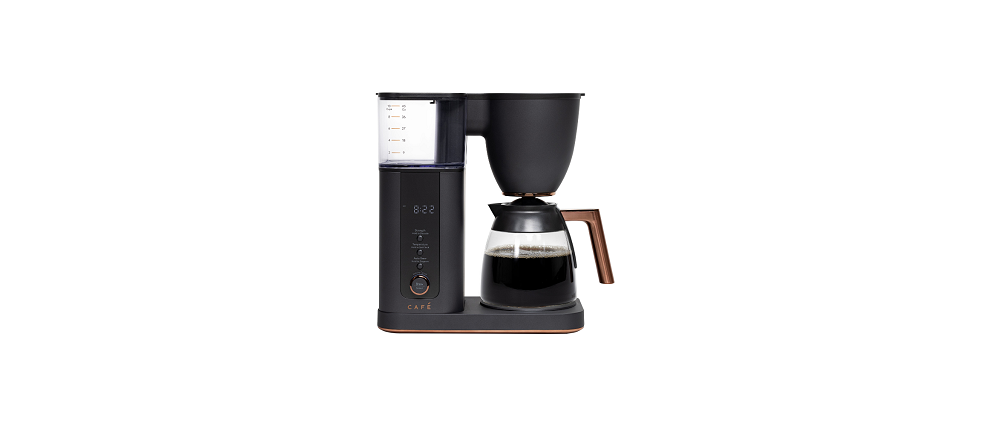
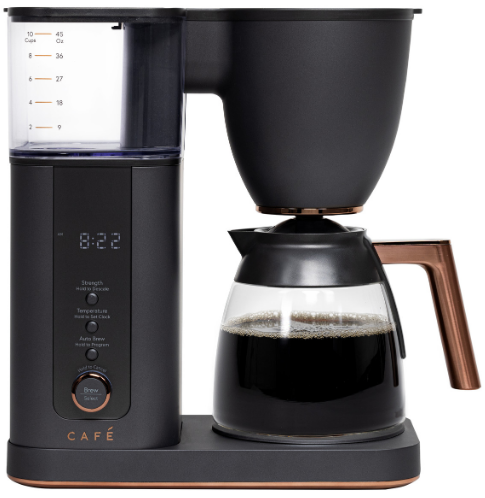
Cafe Specialty Drip Coffee Maker
About Cafe
We at GE Appliances have a creative and passionate culture where everyone is welcome to join the table, their opinions are heard, and discussions result in amazing experiences. People are encouraged to pose “What If?” questions there. We collaborate here to create, manufacture, construct, market, install, and maintain “good things, for life.”
Our company’s economic influence is felt all around the country, enhancing lives, fostering opportunities, and fortifying communities. Our nationwide reach starts with our main office and headquarters in Louisville, Kentucky, and extends to our expanding manufacturing plants in Georgia, Alabama, South Carolina, and Tennessee, as well as supporting operations across 46 U.S. states and other foreign nations.
INFORMATION
THANK YOU FOR MAKING THE CAFÉ A PART OF YOUR HOME. We take pride in the craftsmanship, innovation, and design that goes into every Café product, and we think you will too.
Among other things, registration of your appliance ensures that we can deliver important product information and warranty details when you need them.
IMPORTANT SAFETY INFORMATION
READ ALL INSTRUCTIONS BEFORE USING THE APPLIANCE
WARNING To reduce the risk of fire, explosion, electric shock, or injury when using your coffee maker, always follow these basic safety precautions.
- READ ALL INSTRUCTIONS BEFORE USING
- Use only a 120 V, 60 Hz standard electrical supply that is properly grounded by the National Electric Code and local codes and ordinances.
- Do not touch hot surfaces including glass carafe. Use handles and knobs.
- To protect against electric shock, do not place a cord, plug, or base unit in water or other liquids.
- The product is for household use only. Do not use outdoors.
- To avoid a possible burn hazard, make sure the carafe is clean and empty and the lid is locked before brewing.
- Do not let the cord hang over the edge of the table or counter, or touch a hot surface.
- Scalding may occur if the lid is removed during the brewing cycle.
- Appliances should not be used by or near children.
- To reduce the risk of fire or electric shock, do not attempt to disassemble, repair, modify, or replace any part of your product.
- Use this product only for its intended purpose as described in this user manual.
- Use of any accessories not recommended by the manufacturer can cause injuries.
- Keep ventilation openings in the appliance enclosures or the built-in structure, clear of obstruction.
- Do not place on or near a hot gas or electric burner, or in a heated oven.
- To disconnect, make sure no coffee brewing, then remove the plug from the wall outlet.
- This appliance has a polarized plug (one blade is wider than the other). This plug is intended to fit into a polarized outlet in only one way to reduce the risk of electric shock. If the plug does not fit fully into the outlet, reverse the plug. If it still does not fit, contact a qualified electrician. Do not attempt to modify the plug in any way.
- Do not use an extension cord.
- Unplug from the outlet when not in use and before cleaning. Allow to cool before putting on or taking off parts, and before cleaning the appliance.
- Do not operate any appliance with a damaged cord, if the appliance malfunctions, or has been damaged in any manner, return the appliance to the nearest authorized service facility for examination, repair, or adjustment.
Appliances with Glass Containers
- The container is designed for use with this appliance. It must never be used on a range top. (Unless specific instructions for use on a range top are provided and include the precautions to be observed.)
- Do not set a hot container on a wet or cold surface.
- Do not use a cracked container or a container having a loose or weakened handle.
- Do not clean the container with cleansers, steel wool pads, or other abrasive material.
Components
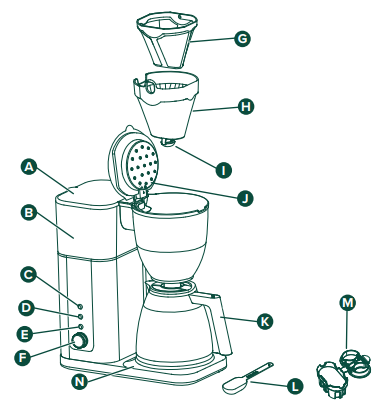
- A Tank Lid
- B Water Reservoir
- C Strength Button
- D Temperature Button
- E Auto Brew Button
- F Brew/Cancel/Select Dial
- G Mesh Basket Filter
- H Brew Basket Insert
- I Drip Stop Lever
- J Showerhead
- K Thermal / Glass Carafe
- L Measuring Scoop
- M Carbon Filter
- N Warming Plate
(Glass carafe models only)
Getting Started
INSTALLATION REQUIREMENTS
- The product is designed to be installed indoors. Do not use your coffee maker outdoors.
- The product must be installed upright on a flat, level surface that can support the total weight when full of water.
- Install the product in a well-ventilated area with an ambient temperature between 55°F and 90°F.
- Do not place the product near heat sources such as ovens or cooktops.
- Do not place the product in direct sunlight.
- Make sure the product can not be accessed by children or animals.
PREPARE COFFEE MAKER FOR USE
- Carefully remove packing material. Do not use sharp tools that can damage the box contents.
- Ensure all components are present. If any item is missing, please contact us at cafeappliances.com (in Canada, contact us at cafeappliances.ca).
- Place the coffee maker upright on a flat, level surface. Make sure the coffee maker is UNPLUGGED at this time.
- Wipe the exterior with a soft, damp cloth. Wash the mesh filter, brew basket, and carafe in warm, soapy water and a soft cloth. Do not use abrasive cleaners, pads, or cloths which can scratch the surface. Rinse and dry thoroughly. Coffee maker parts are NOT dishwasher safe.
- Plug the coffee maker into an electrical outlet. The clock flashes AM noon.
Accessories
CHARCOAL FILTER
Reorder charcoal filters from geappliances.com/ge/parts/. Have your model number ready.
NOTE: It is recommended to replace the charcoal filter every 3 months.
In Canada, visit geappliances.ca/parts-filters-accessories
Setup
CLOCK
- Push the Temperature button and hold for 3 seconds. The clock illuminates on the display and the white dot on the Temperature button will illuminate.
- To set AM/PM: Rotate the Brew/ Select knob and push to select.
- To set the Hour: Rotate the Brew/Select knob and push to select.
- To set Minutes: Rotate the Brew/Select knob and push to select.
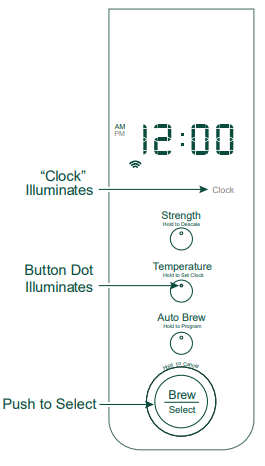
After you confirm to quit, the outer ring will illuminate. The ring will not illuminate to confirm each selection.
NOTE: Push and hold the Brew/Select knob for 3 seconds at any time to exit the sub-menu and revert to the previous settings.
STRENGTH
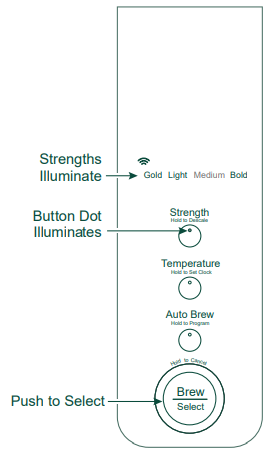
- Push the Strength button. The strength options and Strength button illuminate. The Strength options are Gold, Light, Medium, and Bold.
- GOLD: Brewing to the optimum strength using set parameters. This selection will brew coffee of the highest quality. Cups available are 1 – 10. The temperature selection is not changeable in GOLD. If at high elevation, over 5000 feet, do not use this selection.
- LIGHT: Brewing to the lighter strength is for those who prefer a slightly lower extraction of flavor.
- MEDIUM: Brew to the optimum strength with the option to brew different cup sizes and brew at different temperatures.
- BOLD: Bold is for those who prefer a little higher extraction of flavor.
- Rotate the Brew/Select knob to select the strength and push select or push the Strength button to confirm your selection. The outer ring of the Brew/Select knob will illuminate to confirm selection when pushed.
TEMPERATURE
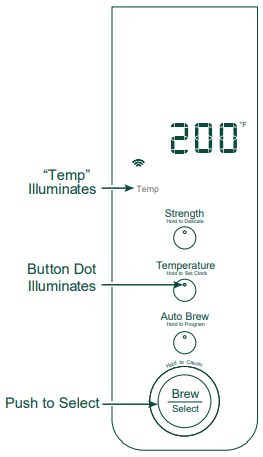
This coffee maker is regulated for temperatures between 185 and 205° F. It is recommended to brew between 195 to 205° F for best flavor extraction. For altitudes over 5000 feet, use 185° F to prevent water from boiling.
- Push the Strength button to make sure the strength is NOT Gold.
- Push the Temperature button. The Temperature button illuminates and the display shows 200.
- Rotate the Brew/Select knob to select the temperature and push select or push the Temperature button to confirm your selection. The outer ring of the Brew/Select knob will illuminate to confirm selection when pushed.
- To switch from Fahrenheit to Celsius, press and hold the Strength and Temperature buttons simultaneously for 3 seconds.
Brewing
- Ensure the brew basket insert and drip stop lever in the bottom of the insert are clean and that the brew basket insert is in the brew basket.
- Use either the mesh basket filter (included) or a No. 4 paper filter (not included) and place it into the brew basket insert.
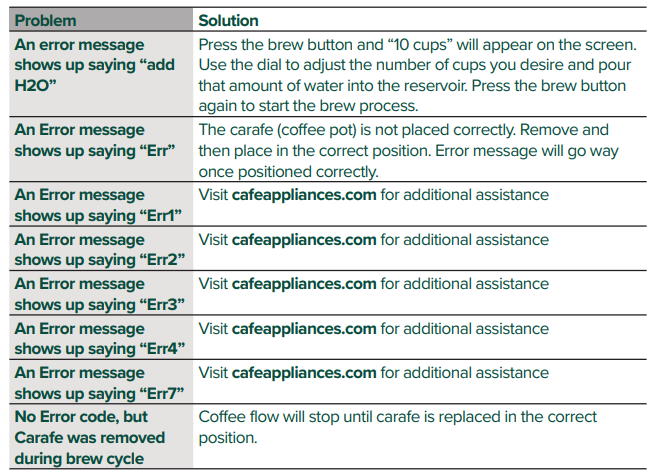
- Ensure the carafe (included) is clean and empty, and the lid is locked. Make sure the carafe is in place before brewing. This coffee maker will NOT brew without the carafe in place. The top of the carafe MUST be engaged with the drip stop lever on the bottom of the brew basket. If not, the water won’t flow into the carafe and the basket may overflow during the brewing cycle. If the carafe is not in place when the brewing cycle is selected, the display will show “Err” and the coffee maker will chime.
- Water: This coffee maker is designed to use only the amount of water for the number of cups selected to be brewed. Fill the water reservoir with fresh, clean, and odorless (free of chlorine and sulfur) water up to the MAX level indicator. DO NOT overfill the water reservoir. Water should have some minerals for the best flavor. Reverse Osmosis (RO) systems or distilled water do not have minerals and are not recommended for coffee brewing.
- Coffee: The type of coffee and freshness are a large factor in the flavor, taste, and aroma of brewed coffee. The grind size of the coffee is for brewing using the drip method.
- Use the scoop (included) to measure the correct amount of coffee for the number of cups you are brewing. The measuring scoop is designed for one level scoop of coffee per 4.5 oz serving of coffee being brewed (4.5 oz of water per serving is the common measurement for a regular cup of coffee). Place the coffee into the filter in the brew basket.
TO BREW:
- After setup of strength and temperature, push the Brew/Select knob. The number of cups will illuminate the display along with the last strength that was chosen. Rotate the Brew/Select knob to choose the number of cups of coffee you want to brew. Push the Brew/Select knob to confirm. Brewing will start.
AUTO BREW:
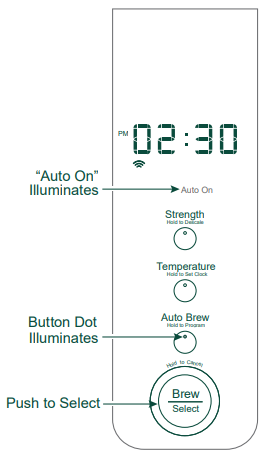
Auto Brew will let you start brewing automatically at a preset time.
- Push the Auto Brew button for 3 seconds to program. Rotate Brew/Select knob to select AM/PM and push to confirm. Then push the Auto Brew button to reconfirm AM/PM. Set the hour and minutes in the same manner pressing Auto Brew after each. Next, set the number of cups by turning the Brew/Select knob and push to confirm. Set the strength and temperature in the same manner. Once all of the selections have been made, the Brew/Select knob illuminates. Push Auto Brew to confirm your choices. Auto On will illuminate to indicate that Auto Brew is active.
NOTE: If Gold strength is selected, you will not be able to select a temperature. The Gold setting is a pre-set program that includes a select temperature. Do not use it for high elevations (over 5000 feet).
FOR GLASS CARAFE MODELS ONLY (C7CDABS2RS3 / C7CDABS3RD3 /C7CDABS4RW3)
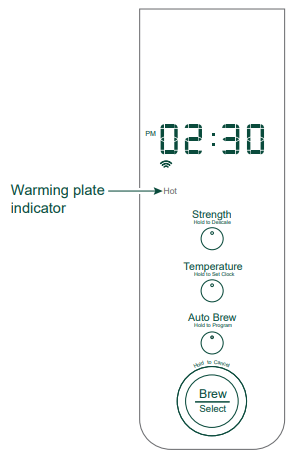
The warming plate will stay on for 2 hours after the brew cycle ends. “Hot” will illuminate the screen to indicate that the warming plate is still hot.
WiFi Setup
PAIRING
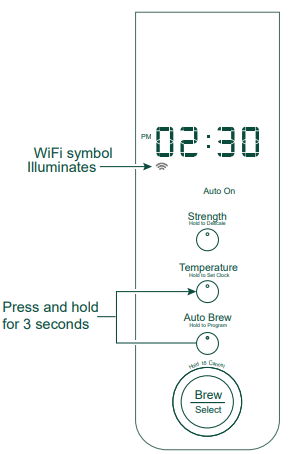
To put your device into Pairing Mode, press and hold the Auto Brew and Temperature buttons at the same time for 3 seconds.
You should see the WiFi symbol illuminate under the Time Display. Now your device is ready for Pairing. Follow the instructions given in the app.
WIFI CONNECT
Your coffee maker is Café WiFi Connect Enabled. A WiFi communication card is built into the product allowing it to communicate with your smartphone for remote monitoring, control, and notifications. Please visit cafeappliances.com/connect to learn more about connected appliance features, and to learn how connected applianceappss will work with your Smart Phone.
- WiFi Connectivity: For assistance with the appliance or the network connectivity, please visit cafeappliances.com/connect.
Care and Cleaning
- CLEANING THE OUTSIDE OF THE COFFEE MAKER
Clean the outside of the coffee maker with a soft, damp cloth. Do not use paper towels or abrasive cloths and cleaners as they may scratch the finish. - CLEANING THE BREW BASKET AND MESH BASKET FILTER
Remove the mesh basket filter and brew basket. Discard any ground coffee. After each brew, rinse the mesh basket filter and brew basket under running water. For a deeper clean, wash in warm soapy water with a soft bristled brush. These parts are NOT dishwasher safe. - CLEANING THE CARAFE
After each use, empty the carafe. Rinse the carafe and lid under warm running water. Letting coffee stand overnight in the carafe can lead to staining. For a deeper clean, wash regularly in warm, soapy water and a soft-bristled brush. Do not use abrasive cleaners as they may scratch the finish. Rinse and dry thoroughly. The carafe and lid are NOT dishwasher safe. - DESCALING
Hard water can cause mineral build-up on internal components. This can cause a change in the taste of the coffee, brewing temperature, and brewing flow. The coffee maker needs to be descaled regularly.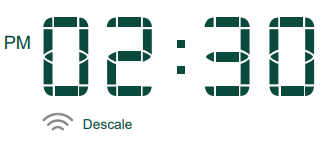
When Descale is flashing under the time display, it means that too much limescale has built up on the heater. Describe the coffee maker as soon as possible according to the below instructions.
The Descale indicator will go off following the first rinse after descaling.
- REMOVE THE FILTER
To remove the filter cage from the water reservoir, use a spoon to wedge under the side tab and lift the cage. To replace it, simply push into the hole until the cage sets into place. It is recommended to change the filter at least every 3 months. - SHOWERHEAD
 The showerhead can be removed by rotating and pulling it out. Make sure the Unlock icon is lined up with the arrow to remove it. For a deeper clean, wash regularly in warm, soapy water and a soft-bristled brush. Do not use abrasive cleaners as they may scratch the finish. Rinse and dry thoroughly.
Troubleshooting Tips
Limited Warranty
If your appliance fails to operate properly while in use under normal household conditions within the warranty period, visit cafeappliances.com/support for product care/maintenance self-help.
In Canada, visit service.geappliances.ca/servicio/en_CA/.
To initiate a warranty claim, please visit cafeappliances.com/support/returns/, or call 1-800-430-1757. Please have your model number and serial number available. Return and packing instruction information will be provided at that time. In Canada, contact us at cafeappliances.ca

Regulatory Information
FCC/IC COMPLIANCE STATEMENT:
This device complies with Part 15 of the FCC Rules. Operation is subject to the following two conditions:
- This device may not cause harmful interference, and
- This device must accept any interference received, including interference that may cause undesired operation.
Any changes or modifications not expressly approved by the party responsible for compliance could void the user’s authority to operate the equipment.
NOTE: This equipment has been tested and found to comply with the limits for a Class B digital device, under Part 15 of the FCC Rules. These limits are designed to provide reasonable protection against harmful interference in a residential installation.
This equipment generates uses and can radiate radio frequency energy and, if not installed and used by the instructions, may cause harmful interference to radio communications.
However, there is no guarantee that interference will not occur in a particular installation. If this equipment does cause harmful interference to radio or television reception, which can be determined by turning the equipment off and on, the user is encouraged to try to correct the interference by one or more of the following measures:
- Reorient or relocate the receiving antenna.
- Increase the separation between the equipment and the receiver.
- Connect the equipment to an outlet on a circuit different from that to which the receiver is connected.
- Consult the dealer or an experienced radio/television technician for help.
- Labeling: Changes or modifications to this unit not expressly approved by the manufacturer could void the user’s authority to operate the equipment.
ConnectPlus module only (or similar communication module)
RF Exposure – This device is only authorized for use in a mobile application. At least 20 cm of separation distance between the ConnectPlus device and the user’s body must be maintained at all times.
FCC ID: ZKJ-WCATA006
IC ID: 10229A-WCATA006
For sale in the 50 United States, District of Columbia, and Canada only: This limited warranty is extended to the original purchaser for products purchased for home use within the USA.
In Alaska and Hawaii, the limited warranty does not include the costs of shipping units. California residents may give additional return options. Please ask the call center for additional information.
Some states do not allow the exclusion or limitation of incidental or consequential damages. This warranty gives you specific legal rights, and you may also have other rights which vary from state to state. To know what your legal rights are, consult your local or state consumer affairs office or your state’s Attorney General.
Warrantor: GE Appliances, a Haier company Louisville, KY 40225
For Customers in Canada: This limited warranty is extended to the original purchaser and any succeeding owner for products purchased in Canada for home use within Canada.
In-home warranty service will be provided in areas where it is available and deemed reasonable by Mabe to provide. For extended warranty information, visit geappliances.ca/purchase-extended-warranty
Warrantor Canada: MC Commercial, Burlington, Ontario, L7R 5B6
Consumer Support
CAFÉ WEBSITE
Have a question or need assistance with your appliance? Try the Café Appliances Website 24 hours a day, any day of the year! You can also shop for more great Café Appliances products and take advantage of all our online support services designed for your convenience. cafeappliances.com
In Canada: cafeappliances.ca
PARTS AND ACCESSORIES
Individuals qualified to service their appliances can have parts or accessories sent directly to their homes (VISA, MasterCard, and Discover cards are accepted). Order online today 24 hours every day.
cafeappliances.com/parts
In Canada: geappliances.ca/parts-filters-accessories Instructions contained in this manual cover procedures to be performed by any user.
Other servicing generally should be referred to qualified service personnel. Caution must be exercised, since improper servicing may cause unsafe operation.
CONTACT US
If you are not satisfied with the service you receive from Café Appliances, contact us on our Website with all the details including your phone number, or write to: General Manager, General Manager, Customer Relations | GE Appliances, Appliance Park | Louisville, KY 40225
cafeappliances.com/contact
In Canada: Director, Consumer Relations, Mabe Canada Inc. | Suite 310, 1
Factory Lane | Moncton, N.B. E1C 9M3
cafeappliances.ca/support/contact-us
For More Manuals by Cafe, Visit Latest Manuals
- Elite Gourmet EHC9420 Automatic Brew & Drip Coffee Maker Instruction Manual
- Hamilton Beach Programmable Dispensing Drip Coffee Maker User Guide
- Bodum Chambord French Press Coffee Maker User Manual
- BUNN Heat N Brew Programmable Coffee Maker Owner Manual
- Hamilton Beach 12 Cup Programmable Front-Fill Drip Coffee Maker Manual
 |
Cafe Specialty Drip Coffee Maker Owner Manual [pdf] |
FAQs About Cafe Specialty Drip Coffee Maker
What is special about drip coffee?
Other than filling the machine and hitting the start button, making drip coffee doesn’t need any human labor from the user, unlike French press or espresso brewing. It also doesn’t need any specialized equipment—all you need is water, ground beans, and a filter.
Is a drip coffee maker better?
Everything is dependent upon your coffee-drinking priorities. Electric drip is the best option if you’re searching for a standard cup that is dependable and speedy. Nonetheless, attempt pour-over to push yourself and perhaps create a wonderful cup that suits your tastes.
Is drip coffee healthy?
According to studies, unfiltered coffee has 30 times more diterpene chemicals, primarily in the form of cafestol and kahweol (coffee oils), which might raise dangerous cholesterol levels. As a result, drinking filtered drip coffee prevents overindulging in unfiltered coffee and keeps daily coffee consumption to fewer than 4 cups.
Does drip coffee taste different?
Because pour-over coffee takes a little longer to brew and extracts more flavor and oil from the coffee beans, it tastes more flavorful than drip coffee. While it tastes great, drip coffee is a little softer and less intense.
Which is better drip or espresso?
It will always be harder to balance an espresso because it has a far higher concentration of bitterness and acids than a drip coffee. Because the concentrations are lower, drip coffee will be easier to balance and produce a better flavor.
Is drip coffee normal coffee?
While espresso, French press, or coffee made with an automatic coffee maker can all be considered types of normal coffee. Coffee made with the drip method, such as in drip coffee makers, is specially referred to as drip coffee.
Is drip coffee hot or cold?
The process of making cold drip coffee involves dripping cold water over a bed of ground coffee for several hours, in contrast to standard brewing methods that use hot water. This process uses time rather than heat to extract the coffee’s oils, flavors, and other components.
How long to soak drip coffee?
After testing both procedures, we discovered that soaking Kopi for approximately 5 minutes yields a cup with a fuller texture and a heavier body. Try a few trials on your own to determine the ideal brewing time for you. You get to choose the dance of your coffee, after all, 😉.
How to clean a drip coffee maker?
Here’s how to clean your drip coffee maker in four simple steps: Fill the water reservoir with equal parts white vinegar and water. Place an empty paper coffee filter in the basket, position the coffee pot beneath the drip spout, and brew. Once the brew cycle completes, discard the vinegar water in the coffee pot.
Does water boil in a drip coffee maker?
Aside from tainting the taste, a coffee maker can only heat water to a point where it never reaches a temperature high enough to destroy any possible bacteria. To accomplish that, water needs to boil at 100ºC (212ºF).

