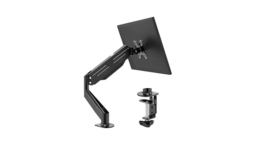
Bracwiser MD7421 Monitor Mount Single Fully Adjustable Arm

Unboxing Instruction
Please open the box carefully and take off protection such as lining and covers. Check all parts and make sure all components and parts are not damaged. Do not use damaged components or parts. Read this manual before installation.
Important Safety Information
Please be careful during installation and operation. Read this manual before installation. Follow the manual and use tools as advised in the package. Installation needs to be completed by a professional or under others’ help. Do not disassemble any components if there is no instruction in the manual. We are not responsible for any loss due to incorrect installation or incorrect use of this item.
Parts

- (1)pole-a
- (1)Grommet/ clamp-b
- (1)Grommet/ clamp support-c

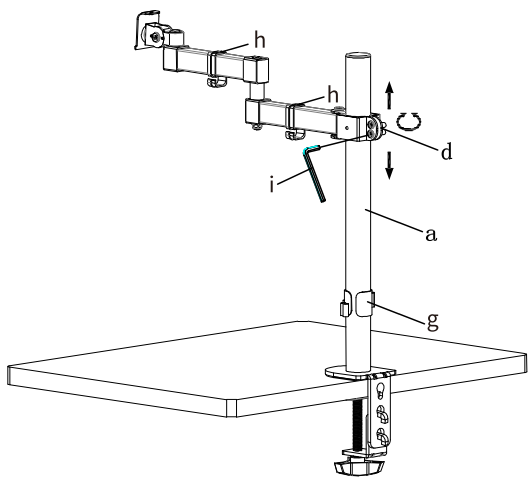
- (1)Swivel arm-d
- (1)VESA plate-e
- (3)M5x18 -f

- (1)wire clip-g
- (2)arm wire clip-h
- (1)S3/S4/S5 wrench-i

- (4)Spacer -H2
- (4)Ф4 Washer-F
INSTALLATION
Step 1 Install the Pole on a Desk
Option A: Clamp installation
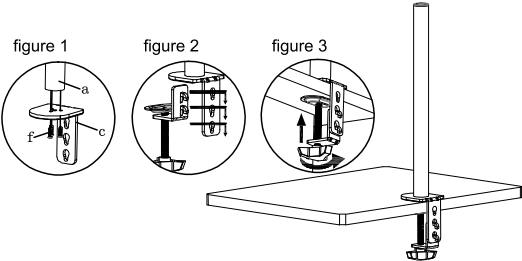
- Connect clamp support (c) and pole (a) with 3 pieces of M5x18 (f) and tighten it with a wrench (i) (figure 1).
- Connect clamp (b) and clamp support (c) with pre-positioned screws and choose the proper hole to sit according to the thickness of the desk (figure 2). Tighten the plastic knob to fix the clamp (figure 3).
Option B: Grommet installation
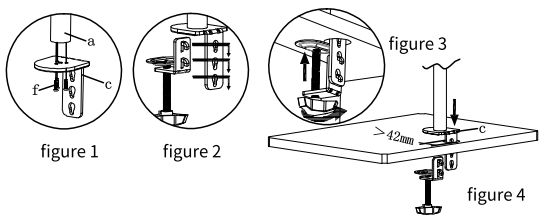
- Connect grommet support (c) and pole (a) with 3 pieces of M5x18 (f) and tighten it with wrench i) (figure 1). Insert grommet support (c) into a desk hole whose diameter is over 1.65in/42mm (figure 2).
- Connect grommet (b) and grommet support (c) with pre-positioned screws and choose the proper hole site according to the thickness of the desk (figure 3). Tighten the plastic knob to fix the clamp (figure 4).
Step 2 Connect the Swivel Arm and Pole
- Place pole wire clip (g) on the pole (a).
- Place arm wire clip (h) on the swivel arm (d).
- Place swivel arm (d) on pole (a). Tighten with a wrench (i) at the proper position.
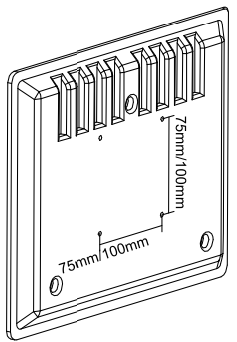
Step 3 Connect the VESA Plate and Monitor
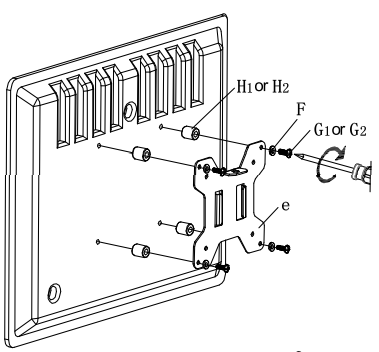
WARNING
Make sure the screws are tightened.
Step 4 Connect Monitor and Mount
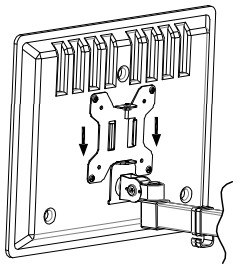
- Insert the monitor into the head of the swivel arm
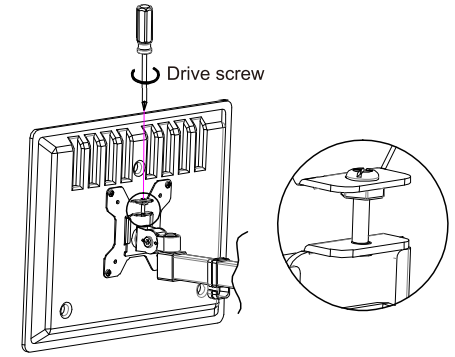
- Drive screw pre-positioned in the plate into the screw hole in the head of the swivel arm
Step 5 Angle Adjustment of Head Sleeve
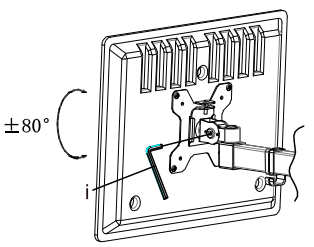
- Adjust the head of the swivel arm according to the needs in case of sagging of the monitor.
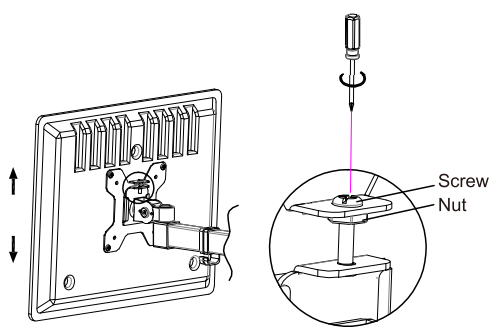
- To adjust the height of the monitor, tighten or loosen the screw, and fix the plate by tightening the nut at the proper position.
Step 6 Cable Management
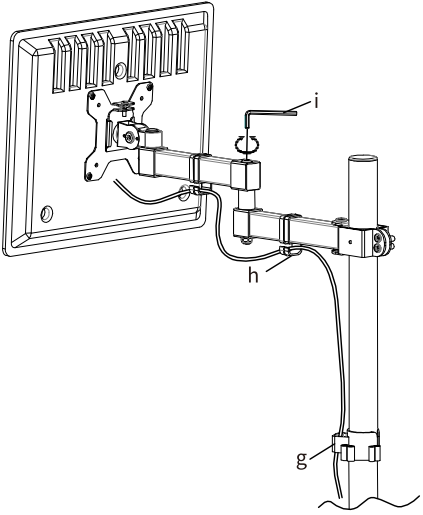
Adjust with a wrench (i). Manage cables with arm wire clip (h) and pole wire clip (g).
we hope you never have the need, but if you do, our service is friendly and hassle-free.
after-sales@bracketwiser.com
For More Manuals by Bracwiser, Visit LatestManuals
FAQs About Bracwiser MD7421 Monitor Mount Single Fully Adjustable Arm
What is the duration of monitor arms?
ten to fifteen years Furthermore, these arms may need yearly maintenance due to extended use or slow gas leaks. Even yet, their ROI is naturally lowered because they might not survive for more than five years. But as times have changed, high-end hydraulic arms that readily last ten to fifteen years are now accessible.
How much weight is supported by a monitor arm?
The arm will raise and stay at its highest point if the monitor weighs less than 0.5 kg (1.1 lbs), whereas the arm will descend and remain close to its lowest point if the monitor weighs more than 15 kg (33 lbs).
Does a TV fit on a monitor arm?
There are a minimum of four distinct threads or holes, depending on the screen’s dimensions and weight. You may place your TV on a wall, table, or ceiling monitor mount thanks to the VESA standard.
Where should my monitor arm be mounted?
It is ideal to place your monitor arm so that the screen is directly in the center of your field of vision for the best posture and the least amount of discomfort.
Does a laptop fit on a monitor arm?
Organize your workspace by using a Laptop Monitor Stand Mount to raise a laptop above the desk! You can set up a dual-display work environment by raising your laptop to eye level and aligning it with the height of your monitor using the laptop holder for monitor mounts.
Can I fit a monitor arm on my desk?
In case your desktop is extremely thin—say, 10 mm or less—a monitor arm might not be appropriate. Once the monitor is placed, check the distribution of weight. Once more, harm is a possibility if the desktop isn’t solid enough. Desks made of commercial-grade office furniture with a 24 mm thickness should work just fine.
Do monitor arms have a purpose?
“Scientific research shows 10-15% more productivity, 33% less errors when using two or three screens.” The correct monitor arm allows you to change the height, depth, and angle of your monitor so you may work in the most comfortable position and with the least amount of discomfort.
What is the ideal height for a monitor arm?
Keep an eye on tips Make sure the top of the screen is at or just below eye level by adjusting the monitor’s height. When looking at the center of the screen, your eyes should be slightly downward. Place the monitor so that it is at least an arm’s length away from your eyes, or 20 inches (51 cm).
Do monitor arms have a standard design?
In one way or another, almost all monitor mounts adhere to this VESA standard. For mounting purposes, monitor manufacturers usually drill a common VESA hole design into the back of the device.
Can I install any kind of monitor?
Yes, most displays can be mounted on a monitor arm in general. The back of most monitors has a standard VESA hole design of either 100 x 100 mm or 75 x 75 mm for mounting to a monitor arm.
Do arms for monitors fit into glass desks?
It is not a good idea to mount a monitor arm on a glass desk; instead, you should take certain safety measures and take the desk’s and the arm’s weight capacities into account.
What is the monitor mount screw size?
The mount to display is attached with M6 or M8 screws.
Can a TV serve as my monitor?
A TV can be used as a monitor, however some adjustments may be necessary. Most modern PCs and HDTVs should be easy to connect to; you just might need to verify a few settings and get a unique connection if your PC’s outputs and your HDTV’s inputs are different.
Will arms for monitors work on any monitor?
Are monitor arms compatible with all monitors? It is advisable to confirm that the monitor is VESA “Compliant,” as the majority of monitor arms adhere to these criteria. Yes, if both of them are abiding by the regulations. I’ve never had a problem with this, but then again, I haven’t owned a non-VESA monitor since the days of CRTs.
My monitor has what kind of mount?
There will be four screw holes on the back of your monitor if it is VESA mount compliant. Measuring the distance between the holes will tell you the size of your mount. Millimeters are used to measure VESA Mount sizing; some of the most popular sizes are shown here.


