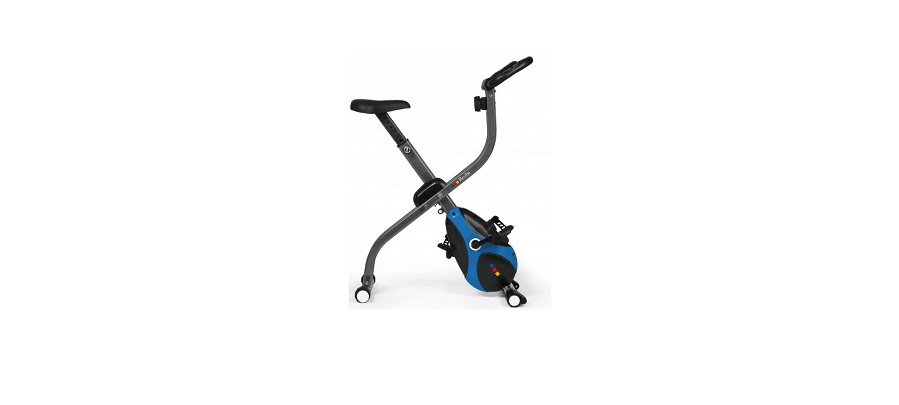
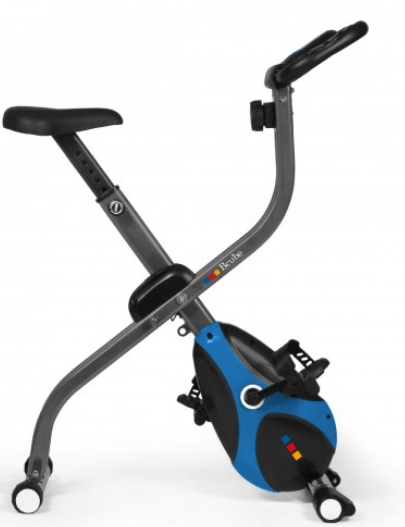
Bcube QB-SMARTYQ Cyclette
OPERATING INSTRUCTIONS
SAFETY INSTRUCTIONS
- Read the entire manual carefully before mounting or operating the device.
- Only use the device as described in the instructions.
- Check that all screws and bolts are properly tightened before using the device.
- Keep hands away from moving parts.
- Keep children and pets away from the device. Never leave children alone with the device.
- Before training, check that all parts of the device are properly assembled.
- The device may only be used by one person at a time.
- Mount and operate the device on a solid, level surface. Always leave a free passage of one meter around the device.
- Do not use the device near water or outdoors.
- Make sure that liquid never enters the device.
- Keep sharp objects away from the device.
- Never use the device if it is not working properly.
- Do not attempt to repair the device yourself without first consulting our service center.
- The device is intended for home use only and must not be used in the commercial sector. The device complies with the EN 957-1/5 HC standard and is not suitable for therapeutic use.
- The device is not suitable for persons with a body weight of more than 110 kg.
SAFETY INSTRUCTIONS FOR TRAINING
CAUTION Before you start training, consult your physician. This is especially important for users with existing health problems.
- Warm up well before starting the workout.
- To brake or stop the flywheel, press firmly on the stop button
- When exercising, always wear appropriate clothing that cannot get caught in the equipment. Do not use the equipment barefoot, always wear sneakers. Do not wear untied shoes, with dangling laces or shoes with leather soles.
- Keep all hanging garments and towels away from the running belt. If an object gets stuck, switch off the device immediately.
- Never operate the device when someone is on it.
- Do not swing or jump on the treadmill.
- If nausea, dizziness, pain, or other unusual physical symptoms occur, discontinue exercise immediately and seek medical attention.
- Disabled persons may use the device only in the presence of qualified personnel or their physician.
- Children should only use the device in the presence of an adult.
- In case of malaise, nausea, chest pain, or other abnormal symptoms, stop training immediately and consult a doctor.
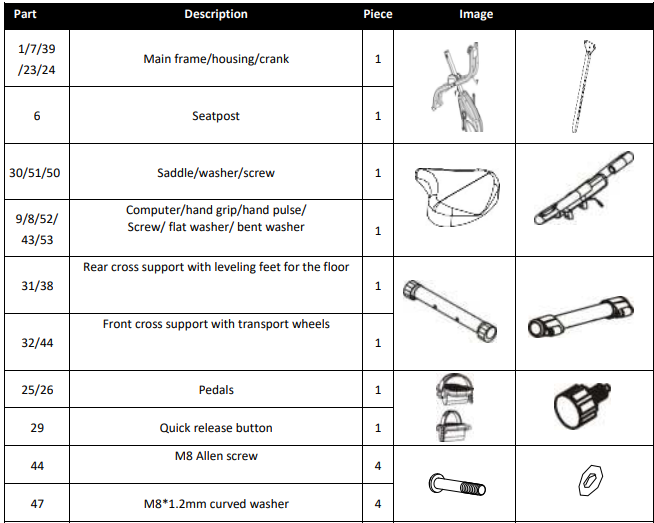
SCOPE OF DELIVERY

ASSEMBLY INSTRUCTIONS
Before you start assembling the unit, please check that all the specified parts are present. Some of the assembly steps require heavy lifting. It is recommended that you have another person assist you in setting up this product.
STEP 1:
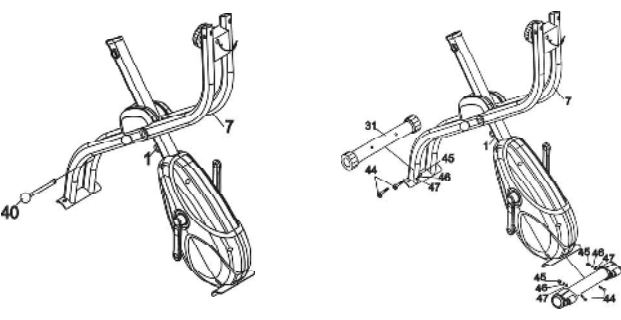
- Remove the locking pin (40) from the frame (1), open the tool, and reinsert the locking pin (40) into the now-open hole in the frame (1).
- Attach the rear cross support (31) to the frame (1) using two curved washers (47), a spring washer (46), 2 bolts (44), and 2 nuts (45).
- Attach the front cross support (32) to the frame (1) using two curved washers (47), a spring washer (46), 2 bolts (44), and 2 nuts (45).
- Tighten the screws and bolts firmly.
STEP 2:
Mount the pedals (26R and 25L) on the crank. The right pedal is marked with the letter “R” and is screwed into the thread of the right crank (also marked with “R”) by turning it clockwise; the left pedal is marked with the letter “L” and is screwed into the thread of the left crank (also marked with “L”) by turning it counterclockwise. Attach the foot strap to both pedals (26R and 25L). The foot strap is adjustable in 4 sizes.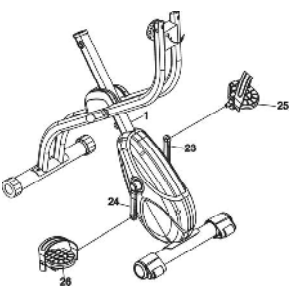
STEP 3:
- Remove the preassembled bolts (50) and washers (51) from the back of the saddle (30). Attach the saddle (30) to the seat post tube (6) using the previously removed bolts (50) and washers (51).
- Insert the seat post tube (6) into the main frame (1) and adjust the height by loosening the quick-release knob (29) in the hole corresponding to the desired height.
CAUTION: DO NOT adjust the saddle height beyond the ‘MAX’ detent displayed.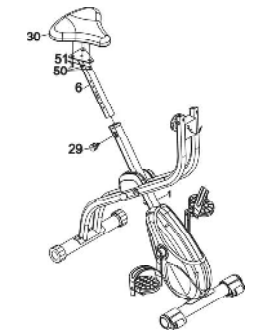
Step 4:
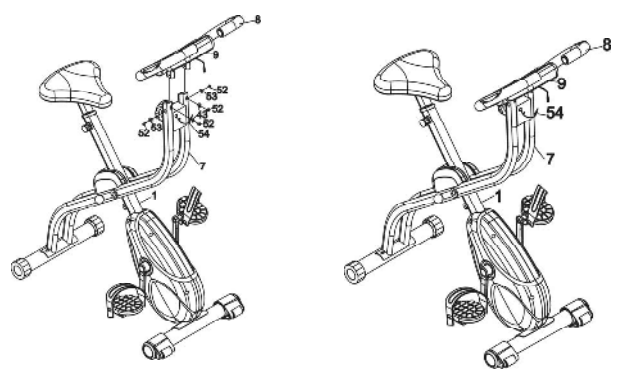
- Please remove pre-assembled screws (52), washers (43), and bent washers (53) from the underside of the handlebar (8)
- Insert the handlebar (8) into the front part of the frame (7) and secure it with the screws (52), flat washers (43) and curved washers (53) previously removed.
- Tighten the screws and bolts firmly.
- Connect the plug of the sensor cable (54) to the corresponding socket of the computer (55).
SPARE PARTS LIST
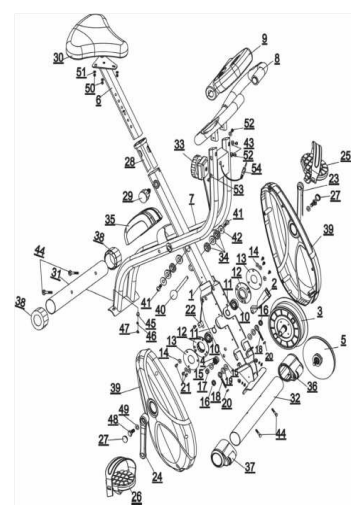
- Main frame
- Magnetic holder
- Flywheel
- Wheel cover set
- Belt set
- Seatpost
- Front cross support
- Handlebar with hand pulse sensor:
- Computer
- Bearing
- Curved washer 417
- Bearing sets
- Large washer
- Washer 414X5mm
- Washer 410.5X20
- Nut M10X5
- Plastic nut M10
- Screw
- Washer 410.5X20X2.0
- M6 nut
- Screw M5X10
- Sensor
- Left crank
- Right crank
- Left pedal
- Right pedal
- Crank cover
- PT30X60 25X50mm cup
- Adjustment knob
- Saddle
- Stabilizer rear
- Front cross support
- Resistance handwheel
- Bearing
- Cover
- Left transport wheel
- Right transport wheel
- Base leveling foot
- Flywheel cover
- Locking pin
- Nut M8X15
- Washer 48.5X24X2.0
- Curved washer @6.5X16X1.2
- Sliding bolt M8X60
- Cap nut
- Spring washer M8
- Curved washer 20X8,5X1,2
- Screw M8X15
- Washer 414X8,5X1,2
- Lock nut M8
- Washer 416X8.5X1.5
- Screw M6X10
- Washer W14X6,5X1,2
- Intermediate sensor cable
- Computer sensor cable
COMPUTER OPERATION
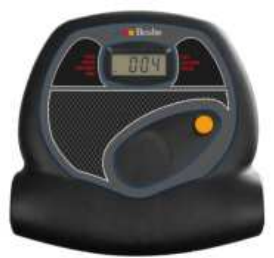
FUNCTIONAL KEYS:
- MODE – to select functions.
- SET – To set the values for time, distance, and calories when not in scan mode. Use the MODE button to select the value you want to set. Once it flashes, you can enter the value with the SET button.
- RESET – press to reset time, distance, and calories.
DISPLAYS AND OPERATION:
- Press the “MODE” button until the word “SCAN” appears on the left side of the monitor – the values for time, speed, distance, odometer, calories, and pulse are now displayed alternately for 6 sec. each. Pressing the MODE button on one of the values will display permanently:
- TIME: Shows the time from the beginning of the training from 0:00 – 99:59 min
- SPEED: Display of the current speed from 0:00 – 99:99 km/h
- DISTANCE: display of distances from 0:00 – 99:99 km
- ODOMETER: The monitor displays the total accumulated distance from 0 – 9999 km. After the battery is reinserted, the value is reset to zero
- CALORIES: Shows the calories burned from 0 – 999.99 kCal
- PULSE: Shows the user’s current heart rate value from 60 – 240 bpm (the reading cannot be considered a basis for medical treatment).
NOTICE:
- When the battery symbol lights up on the display, please replace the battery.
- The monitor will turn off automatically if no signal is received after 2 minutes.
- The monitor turns on automatically when you start training.
- If you interrupt the training for 4 seconds, the display will stop the calculation, and a “STOP” will appear on the screen. When you resume the training, the display automatically starts the calculations, and the “STOP” disappears.
CUSTOMER SERVICE:
In case of breakage, damage, or missing parts, please contact our service center for original spare parts. In the meantime, do not use the device.
DISPOSAL INSTRUCTIONS
The packaging materials are recyclable. Please dispose of the packaging in an environmentally friendly manner. Do not dispose of electrical equipment in household waste. According to the European Directive 2002/96/EC on waste electrical and electronic equipment and its implementation in national law, the following must be disposed of used electrical equipment must be collected separately and recycled in an environmentally friendly manner.
If the products contain batteries or rechargeable batteries that are not permanently installed, these must be removed before disposal and disposed of separately as batteries.
For More Manuals by Bcube, Visit Latest Manuals

