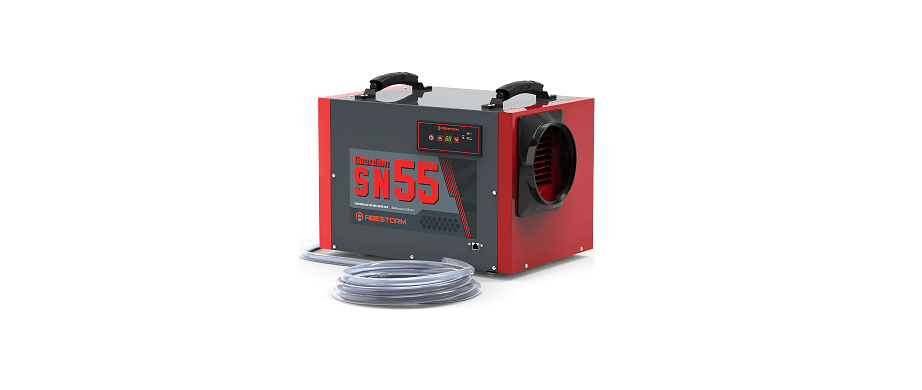
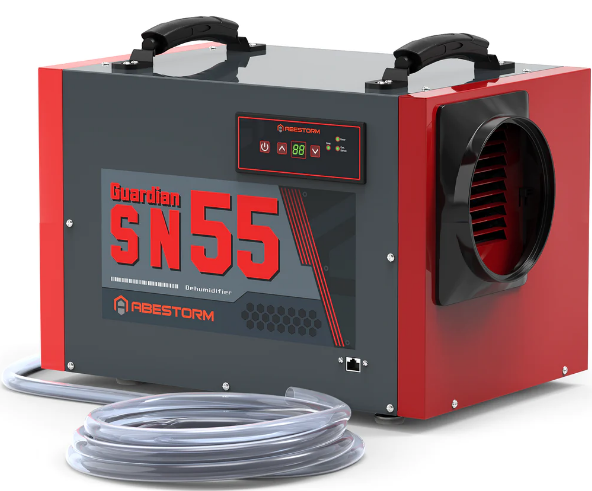
Abestorm Guardian SN55 120Pint Crawl Space Dehumidifier
About Abestorm
Abestorm Crawl Space NeatyFresh Max allows for the free circulation of air on the porch and under the house. High moisture levels in the crawl spaces can lead to the decay and rot of wooden pillars that support the house, floor, joists, and beam pillars. Also, high humidity causes an increase in termite activity and the growth of fungi. Rust, which causes corrosion and leaks in metallic pipes, is also factored into the moisture level in your crawl space.
With our ventilation fan, radon gas from treated wood is expelled away. This gas and other odors can easily spread into the living room and cause discomfort. The NeatyFresh Max fan uses a humidity switch to control the fan to commence operation. The fan starts operating when the recorded humidity surpasses the selected value.
Safety Notes
- The Guardian Series Dehumidifier must always be connected using a grounded electrical connection (as required for all electrical appliances). If non-grounded wiring is used, allLiabilityy reverts to the owner and the warranty is voided.
- Guardian Dehumidifiers should only be maintained and repaired by a qualified technician.
- Guardian Dehumidifiers are only intended for operation when oriented with the unit sitting on its feet and level. Operating the unit in any other orientation could allow water to flood electrical components.
- Always unplug the dehumidifier before moving.
- If there is a chance that water floods the dehumidifier, it should be opened and allowed to dry thoroughly before reconnecting to electrical power and restarting.
- To ensure proper operation, neither the inlet nor the discharge should be positioned against a wall. The inlet requires a minimum of 6′ clearance and the discharge requires a minimum of 6′ clearance.
- For better use of the dehumidifier, both air inlet and air outlet should be facing the open area of the space.
Electrical Supply
- Power Supply: 115 V, 60 Hz AC, Single Phase
Outlet Requirement: 3-Prong, GFCI
Circuit Protector: 15 Amp
Principle of Operation
The Guardian Series Dehumidifier utilizes its integral humidistat to monitor the conditioned space. When the relative humidity goes above the selected set point, the dehumidifier will energize. Air is drawn across an evaporator coil, which is cooler than the dew point of air.
This means moisture will condense out of the air. The air is then reheated through the condenser coil and distributed back into the room.
Installation
The area to be controlled should be sealed with a vapor barrier. If the unit is installed in a crawlspace, all vents should be sealed.
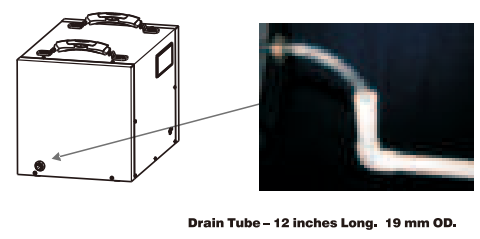
- Cut a piece of 3/4″ OD PVC that is approx. 6″ long.
- Insert PVC into a 3/4″ elbow, then attach to a 3/4″ OD length of PVC to drain. (Note: Keep the length of the PVC drain pipe to a minimum).
- Insert the open end of the tubing into the 3/4″ pipe so that it does not extend into the elbow fitting. For proper flow, a minimum downward slope of 1″ per 10′ run is required. (Note: If a proper downward angle is not possible, then it is recommended to use a Guardian SNS65S which includes an integrated pump).
- Support the PVC tubing so that it maintains a smooth downward flow to drain.
- Always test the drain before leaving the installation area.
Kev Functions
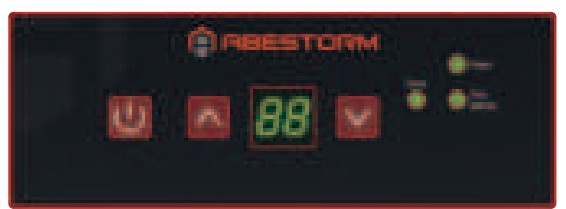
- Power Key
- Use this button to turn the dehumidifier on and off Press once to turn the machine on You will hear one beep and the Power light will illuminate green. Press the power button a second time and you will hear one beep as the machine shuts down. Note that there is a one-minute fan delay on shutdown.
- Arrow Buttons
- Use the up and down arrow buttons to set the desired humidity setpoint on the display screen.
- Continuous Mode
- To switch into continuous mode, simply use the down arrow to set the humidity below 36%. The Cont. light should illuminate green on the display board to indicate that you have successfully switched into continuous mode. The display screen will show “CO”.
- When set to continuous, the dehumidifier will run constantly, regardless of the humidity level. To stop the machine, turn the unit off or switch back to normal humidistat operation. If you would like to switch back to normal humidistat operation, simply move the setpoint above 36%.
- Central Control
- This mode is not applicable on the Guardian SN55 / Guardian SN55S.
- The central Control light should be off at all times when not connected to the AC.
Remote Control Instructions
Guardian Dehumidifiers can be controlled using an optional remote accessory. The Guardian Remote Control connects to your Guardian Series Dehumidifier via a 25′ CAT 5 cable. The remote control contains an integrated sensor which gives you multiple options for remotely controlling your unit, in addition to monitoring the conditions surrounding the dehumidifier.
One application for the remote control is to install the dehumidifier in one room with the conditioned air ducted into a second room that contains the remote. For example, the dehumidifier could be installed in a laundry room and ducted into a living room.
The remote would then be mounted in the living room so the remote sensor can control the humidity and provide easy controls for the user. Another useful application for the remote control is if the dehumidifier is in a rea that’s difficult to access regularly.
For instance, if your dehumidifier is installed in your crawl space, the remote could be mounted in your living space or garage. This provides you with an easy way to monitor the dehumidifier.
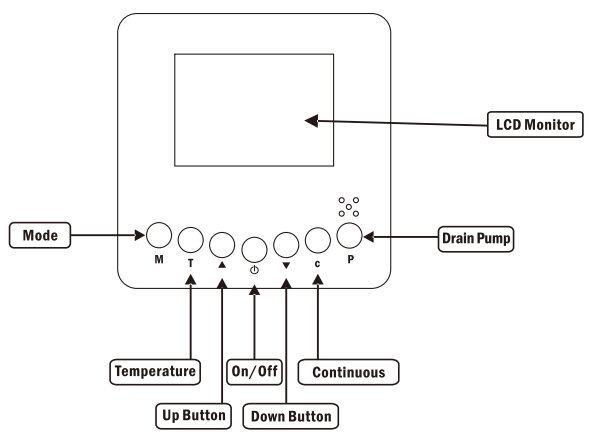
- On/Off (Power)Button
Press the on/off button and the machine will start running (one beep). Press the button again to turn the machine off. - Up Button 4 / Down Button
Use the Up and Down arrow buttons to adjust the humidity level. - Mode M
Use the Mode button to switch between dehumidification and a ducted application.- The symbol on the display board indicates the sensor on the remote control is being utilized.
- Temperature T
Press the temperature button to display the current temperature on the screen. Press the button again to turn off the display. - Continuous C
Press this button to switch the unit into continuous mode. Cont. will appear on the display to indicate continuous mode. - Drain Pump P
Use this button if the unit will not be in use for an extended period. Pressing the drain pump button will remove water from the pump reservoir, so the unit can be safely moved or stored. THIS FUNCTION IS ONLY AVAILABLE ON THE Guardian SNS65S / Guardian SNS90 / Guardian SNS100 / Guardian SNS120 model
Operating Instructions
- Start the Machine
Press the power key to turn the machine on. - Adjust the Settings
Use the up and down arrow keys to adjust your desired setpoint (typically 50-55%). - Stop the Machine
Press the power key again and the machine will stop. Note the fan will continue to operate for 1 minute after the unit has turned off. NOTE: Do not disconnect the power cord to force the unit to stop. Always use the power button. - Water Drainage
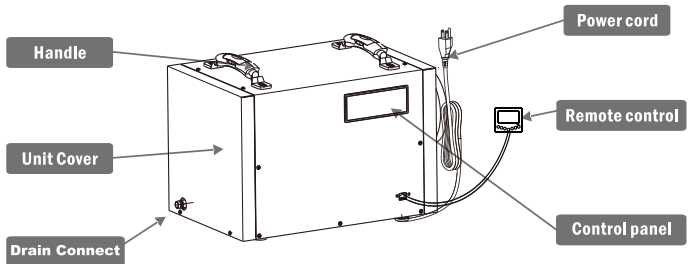
During normal operation, the dehumidifier will automatically drain by the force of gravity. If you want to move or store your machine, wait at least 10 minutes to allow the machine to completely defrost, then lean the unit gently towards the drain to ensure that it is completely drained.
Front View
Back View
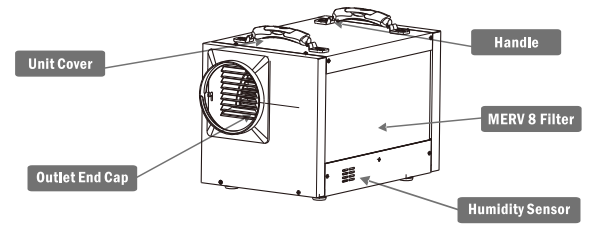
Maintenance
WARNING: Always unplug the unit before doing any maintenance.
Replacement filter and steps
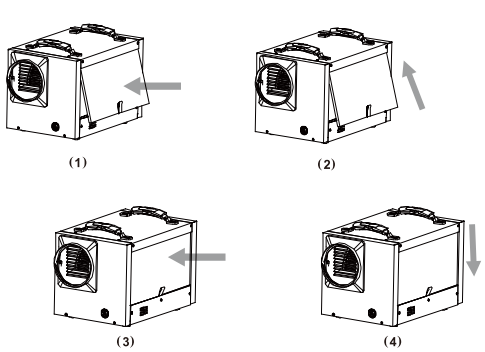
- As shown in the figure above, tilt the filter into the filter slot.
- Push the filter upwards until it touches the top of the air filter slot.
- Push the bottom of the filter into the filter groove.
- Let the filter slide down freely.
Cleaning the filter
- Unplug the unit.
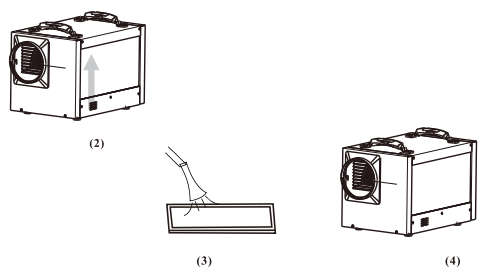
- Push up the filter.
- Clean the filter mesh by vacuuming or washing with warm water (no soap or solvents).
- Be sure the filter is completely dry before restarting the unit.
Dehumidifier Storage
If the unit will be stored for an extended period, complete the following steps:
- Turn off the unit and allow it to dry.
- Wrap and secure the power cord.
- Cover the filter mesh.
- Store in a clean. dry space.
Ducted Applications
Ducting the dehumidifier allows the unit to be in one room while conditioning an adjacent room. The supply grille is designed for 6″ flex ducting. Be sure to secure the ducting with tie wrap. Also, keep in mind that the supply ducting can be screwed into an adapter if necessary.
Ducting Installation
- Maximum length for ducting= 6′
Removing the Supply Duct Adapter
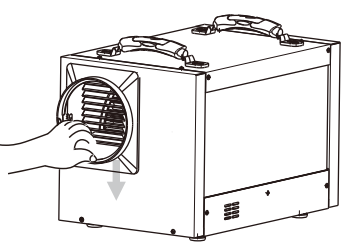
If it is necessary to remove the adapter, place your hand at the bottom of the adapter and use your fingers to pull it out and down on the base of the adapter. This will lift hooks out of cover holes.
Installing Supply Duct Adapter
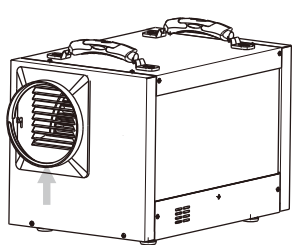
To install the adapter, line up with holes on the side of the unit and push up from the base of the adapter.
Flex Duct Installation
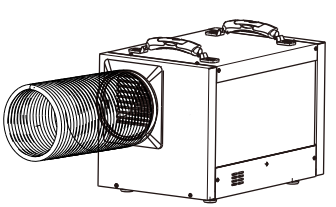
Rotate the flex duct counter-clockwise.
Flex Duct Removal
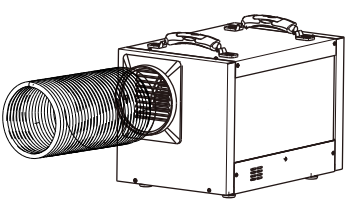
Rotate the flex duct clockwise.
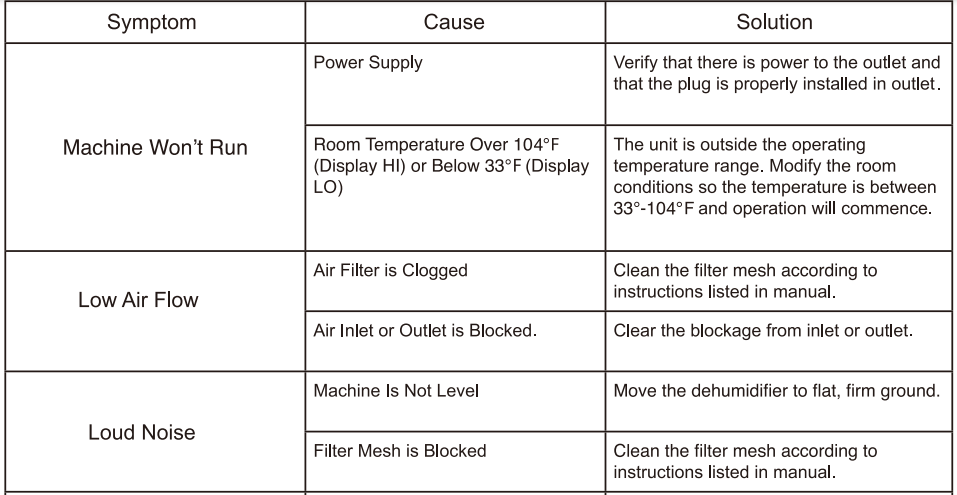
Troubleshooting

Spare Parts
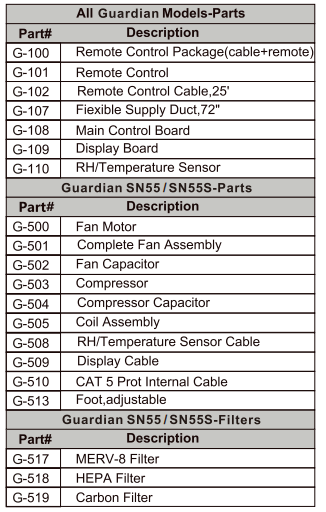
Limited Warranty
This limited warranty starts from the date of purchase. Abestorm Solutions Inc. warrants to the original purchaser that this Abestorm product is free from manufacturing defects in material or workmanship for the limited warranty period of:
- Six (6) months of parts and labor. This includes the shipment charges for replacement parts or units.
- One (1) year parts and labor. This does not include the shipment charge to send the defective product back to be repaired or replaced.
- Three (3) years of parts and labor on Refrigeration System ONLY (Compressor, Condenser, and evaporator). Transportation costs are not included.
- Five (5) years parts on Refrigeration System ONLY(Compressor, Condenser, and evaporator). Transportation costs are not included.
This limited warranty is valid only on products purchased from the manufacturer or Abestorm authorized dealer and operated, installed, and maintained according to the instructions included in this user guide or furnished with the product. Abestorm Solutions Inc. will not provide in-home service during or after the warranty period. You may be responsible for the shipping charge to bring the product to the manufacturer for service.
To receive warranty service, the purchaser must contact Abestorm at (888) 276-9833 or sales@abestorm.com. A proof of purchase or order number is required to receive warranty service. During the applicable warranty period, a product will be repaired or replaced at the sole option of Abestorm.
IMPORTANT NOTICE: Keep the item’s packaging in case warranty service is required.
Limited Warranty Exclusions
This limited warranty covers manufacturing defects in materials or workmanship encountered in normal household, commercial, or noncommercial use of this product and shall not cover the following:
- Damage occurs in uses for which this product was not intended.
- Damage caused by unauthorized modification or alteration of the product.
- Cosmetic damage including scratches, dents, chips, and other damage to the product’s finishes.
- Damage caused by abuse, misuse, pest infestation, accident, fire, floods, or other acts of nature.
- Damage is caused by incorrect electrical line current, voltage, fluctuations, and surges.
- Damage caused by failure to perform proper maintenance of the product.
The use of this product in SPA or a room with an OUTDOOR POOL invalidates or voids the limited warranty.
Identification
For future reference, write down the model, serial number, and date of purchase for your dehumidifier. This is extremely helpful if you need to seek assistance in the future. The data label on the side of your unit has the key characteristics of your specific machine.
For additional questions concerning your dehumidifier, the following options are available:
- Contact your installing contractor
- E-mail: sales@abestorm.com
Abestorm Solutions INC.
Add: 8605 SANTA MONICA BLVD#79525
WEST HOLLYWOOD, California, 90069 USA
E-mail: sales@abestorm.com
For More Manuals by Abestorm, visit LatestManuals
- Abestorm 180 PPD Commercial Dehumidifier with Pump User Guide
- Abestorm 160p PPD Commercial Dehumidifiers User Manual
- Abestorm 260CFM Crawlspace Ventilator Fan User Manual
- Abestorm Hurricane 85P Pints Commercial Dehumidifiers User Manual
- Abestorm 270 PPD Commercial Dehumidifier with Pump User Manual
FAQs About Abestorm Guardian SN55 120Pint Crawl Space Dehumidifier
In a crawl space, how frequently should a dehumidifier be run?
In your crawl space, how long should a dehumidifier run? All it takes is 12 hours a day to run an effective dehumidifier that maintains a relative humidity of between 50% and 55% in your crawl space.
In the winter, is a crawl space dehumidifier necessary?
Most people believe that the air will become drier during the winter. And while that is sometimes the case, winter precipitation—such as snow, sleet, and freezing rain—can contribute a significant amount of extra moisture. A dehumidifier is a wise purchase if you want to keep your crawlspace dry.
In a crawl space, where is the ideal location to install a dehumidifier?
This leads me to my final piece of advice: In order to allow the condensate to effectively drain into a condensate pump or a gravity drain that removes the condensate from the crawlspace, a dehumidifier must be built on a level base, preferably raised off the ground level of the crawlspace by at least 4 to 6 inches.
Can you use a dehumidifier in a crawl space without encapsulation?
Is it Possible to Use a Dehumidifier in a Crawl Space Without Enclosure? The short answer is “yes,” but this procedure is not professional or energy-efficient, so we do not advise it.
How much electricity is needed for a dehumidifier in a crawl space?
580–850 watts, around The average power consumption of a crawl space dehumidifier is between 580 and 850 watts. That is quite the energy!
How long is a dehumidifier safe to run?
Is it appropriate to operate your dehumidifier continuously? Running a dehumidifier for 12 hours a day is advised to get the appropriate indoor relative humidity levels of 35 to 50 percent.
Do dehumidifiers function in the winter?
At very low temperatures, the dehumidifier will shut down and provide the desired opposite effect. Make careful to turn on the heater over 40°F if you need to dehumidify your area. Try temps around 60°F and higher for the best outcome. It’s critical to check for excessive humidity in your home.
When is the best time to use a dehumidifier?
Thus, even while a dehumidifier might be useful in the spring, summer and early fall, it’s advisable to unplug your device as the winter months approach. It’s a good idea to consider upgrading your dehumidifier as winter gives way to spring and you go to turn it on.
Where should a crawl space dehumidifier be emptied?
I advise placing it at least two feet—if not farther—away from the foundation and on a downhill slope.
What is the crawl space dehumidifier’s capacity?
The cost of a Santa Fe crawl space dehumidifier The most popular Santa Fe Compact 2 dehumidifier is available at Sylvane.com for $1,118.99. On the Sylvania website, the Santa Fe Advance90 dehumidifier with two fans costs $1379.99, while the Advance100 dehumidifier costs $1798.99.

