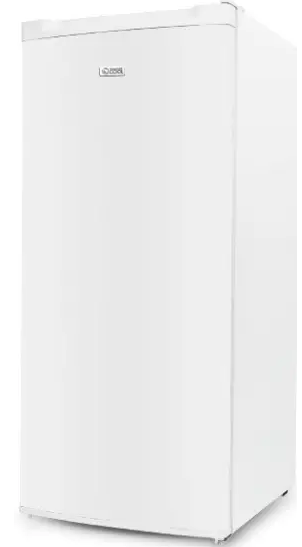
Insignia NS-UZ7WH0 Upright Freezer
Introduction
Congratulations on your purchase of a high-quality Insignia product. Your NS-UZ7WH0 represents the state-of-the-art freezer design and is designed for reliable and trouble-free performance.
RECOMMENDATIONS
- This appliance is intended to be used in households and similar applications such as staff kitchen areas in shops, offices, and other working environments; farm houses and by clients in hotels, motels, and other residential type environments; bed and breakfast type environments; catering and similar non-retail applications.
- If the supply cord is damaged, it must be replaced by the manufacturer, its service agent, or similarly qualified persons to avoid a hazard.
- Do not store explosive substances such as aerosol cans with a flammable propellant in this appliance.

- The appliance has to be unplugged after use and before carrying out user maintenance on the appliance.

- Keep ventilation openings, in the appliance enclosure or the built-in structure, clear of obstruction.
- Do not use mechanical devices or other means to accelerate the defrosting process, other than those recommended by the manufacturer.
- Do not damage the refrigerant circuit.
- Do not use electrical appliances inside the food storage compartments of the appliance, unless they are of the type recommended by the manufacturer.
- Please abandon the appliance according to local regulators for it uses flammable blowing gas and refrigerant.
- When positioning the appliance, ensure the supply cord is not trapped or damaged.
- Do not locate multiple portable socket outlets or portable power supplies at the rear of the appliance.
- Do not use extension cords or ungrounded (two-prong) adapters.
- Risk of child entrapment. Before you throw away the appliance:
- Take off the doors.
- Leave the shelves in place so that children may not easily climb inside.
- The appliance must be disconnected from the source of the electrical supply before attempting the installation of the accessory.
- Refrigerant and cyclopentane foaming materials used for the appliance are flammable.
- Therefore, when the appliance is scrapped, it shall be kept away from any fire source and be recovered by a special recovering company with corresponding qualifications other than be disposed of by combustion, to prevent damage to the environment or any other harm.
- Children should be supervised to ensure that they do not play with the appliance.
Meaning of safety warning symbols
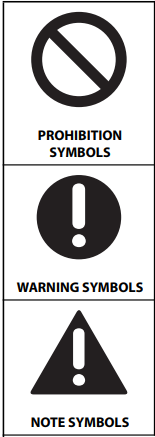
- The symbols indicate prohibited matters, and those behaviors are forbidden. Non-compliance with the instructions may result in product damage or endanger the personal safety of users.
- The symbols indicate matters that must be followed, and those behaviors must be strictly executed in line with the operation requirements. Non-compliance with the instructions may result in product damage or endanger the personal safety of users.
- The symbols indicate matters to pay attention to, and these behaviors shall be specially noted. Due precautions are needed or minor or moderate injuries or damages of the product will be caused.
This manual contains lots of important safety information which shall be observed by the users.
Warnings related to placing items
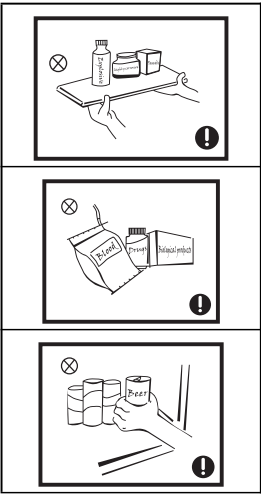
- Do not put flammable, explosive, volatile, and highly corrosive items in the upright freezer to prevent damage to the product or fire accidents.
- Do not place flammable items near the upright freezer to avoid fires.
- This product is a household upright freezer and shall be only suitable for the storage of foods. According to national standards, household upright freezers shall not be used for other purposes, such as storage of blood, drugs, or biological products.
- Do not place items such as bottled or sealed containers of fluid such as bottled beers and beverages in the upright freezer to prevent bursts and other losses.
Warnings for energy
- An upright freezer might not operate consistently when sited for an extended period below the cold end of the range of temperatures for which the appliance is designed.
- The fact that effervescent drinks should not be stored in food upright freezer compartments or cabinets or low-temperature compartments or cabinets and that some products such as water ice should not be consumed too cold;
- The need to not exceed the storage time recommended by the food manufacturers for any kind of food and particularly for commercially quick-frozen food in food-upright freezer and frozen-food storage compartments or cabinets;
- The precautions necessary to prevent an undue rise in the temperature of the frozen food while defrosting the refrigerating appliance, such as wrapping the frozen food in several layers of newspaper.
- The fact that a rise in the temperature of the frozen food during manual defrosting, maintenance, or cleaning could shorten the storage life.
- The necessity is that, for doors or lids fitted with locks and keys, the keys be kept out of the reach of children and not in the vicinity of the upright freezer appliance, to prevent children from being locked inside.
Features
Package contents
- 7 Cu. Ft. Upright Freezer
- Accessory bag with hardware for reversing the door
- User Guide
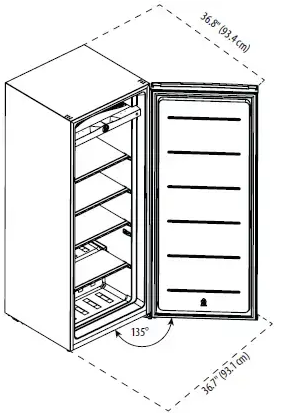
Dimensions
Note: The illustrations shown in this User Guide are for reference only. The actual product may differ slightly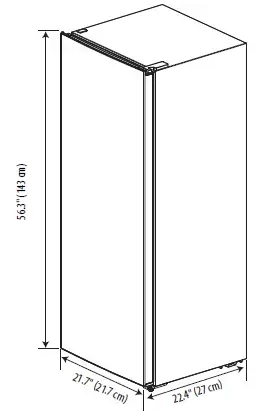
Components
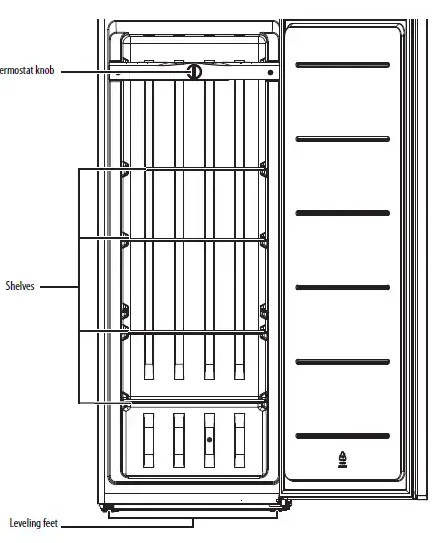
Thermostat knob
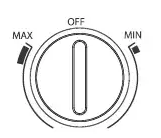
| ITEM | FUNCTION |
| Thermostat knob | Turn the knob to adjust the temperature.MIN is the warmest temperature. MAX is the coldest temperature. The temperature range is 10.4°F to
-11.2°F (-12°C to -24°C). Turn to the OFF position to turn your freezer off. |
Setting up your freezer
- Before using your freezer, remove the exterior and interior packing including the bottom cushions, foam pads, and tape inside your freezer. Remove the plastic film from the door and sides.
- Let your freezer stand upright for more than 30 minutes before connecting it to power. This reduces the possibility of a malfunction in the cooling system from incorrect handling during transportation.
- Before putting any fresh or frozen foods in your freezer, let your freezer run for two to three hours. If the ambient temperature is high, for example in summer, wait for four or more hours.
- Wash the inside with a damp, warm cloth and a baking soda solution (two tablespoons in a quart of water), then wipe dry with a dry cloth. Do this periodically to keep your freezer looking new.
- For correct operation, you should level your freezer using the leveling feet. If you do not level your freezer, the door may not close or seal correctly, causing cooling, frost, and moisture problems. See Leveling your freezer on page 14.
- When moving your freezer, do not tilt it beyond 45° from upright
Finding a suitable location
- Place your freezer on a floor that is strong enough to support your freezer when it is fully loaded.
- Do not install your freezer on carpeting or a rug.
- Your freezer is designed to be free-standing and should not be recessed or built-in.
- If you use your freezer in a garage, make sure that the ambient temperature is between 5°F and 109°F (-15°C and 43°C).
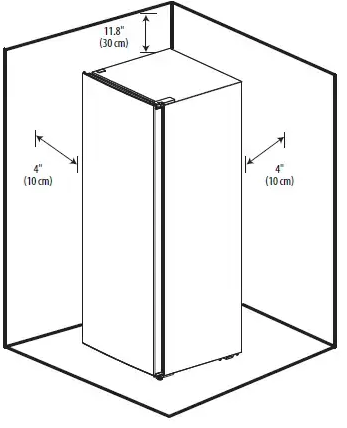
- Allow 4 inches (10 cm) of space between the sides of your freezer and the surrounding walls, 4 inches (10 cm) between the back of your freezer and the wall, and 11.8 inches (30 cm) between the top of your freezer and the ceiling.
- This allows for correct air ventilation. Adjust the feet to keep your freezer level. See Leveling your freezer on page 14.
- Position your freezer away from direct sunlight and sources of heat, such as a stove, heater, or radiator. Direct sunlight may affect the acrylic coating and heat sources may increase electrical consumption. Extremely cold temperatures may also prevent your freezer from performing correctly.
- Avoid locating your freezer in moist areas.
- If you locate your freezer next to a fixed wall, allow sufficient space on the hinge side for the door to swing open.

Leveling your freezer
- If you do not level your freezer during installation, the doors may not close or seal correctly which can cause cooling, frost, or moisture problems.
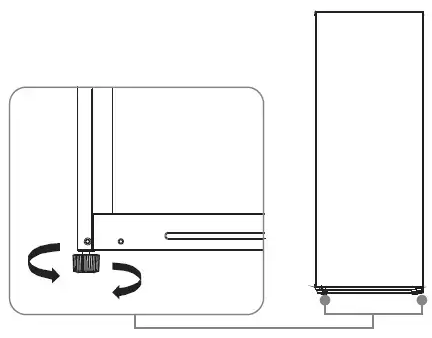
- To level your freezer, rotate the leveling feet clockwise (to raise) your freezer or counter-clockwise (to lower).
Note: To make it easier to adjust the feet, have someone push against the top of your freezer to tilt it slightly.
Reversing the door
WARNINGS:
- Unplug your freezer before you reverse the door. Failure to unplug your freezer may result in serious injury or death from electrical shock.
- To avoid personal injury and property damage, get another person to help you reverse the door.
Note: The illustrations shown in this section are only for reference. The actual product may differ slightly.

You need the following tools to reverse the freezer door:

- Flat-blade screwdriver
- Phillips screwdriver
- Tape
- Unplug the power cord and remove all food from your freezer.
- Tape the freezer door shut.
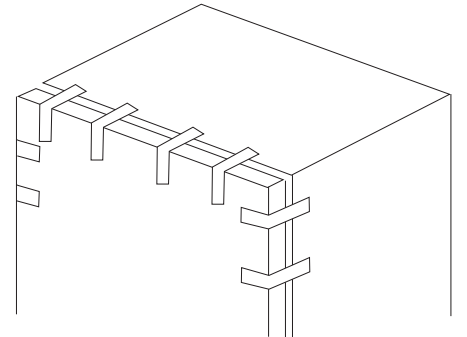
- Remove the left hinge hole cap. Remove the upper-right hinge cover, the hinge screws, then remove the top hinge.
- Remove the tape, then remove the door.
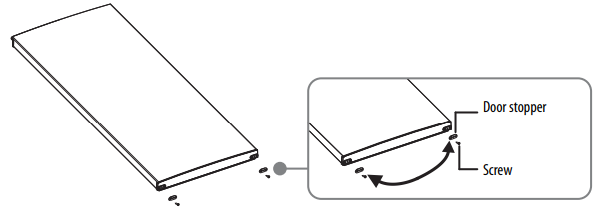
- Remove the door stopper screw and the door stopper, then install the stopper on the other side of the door.
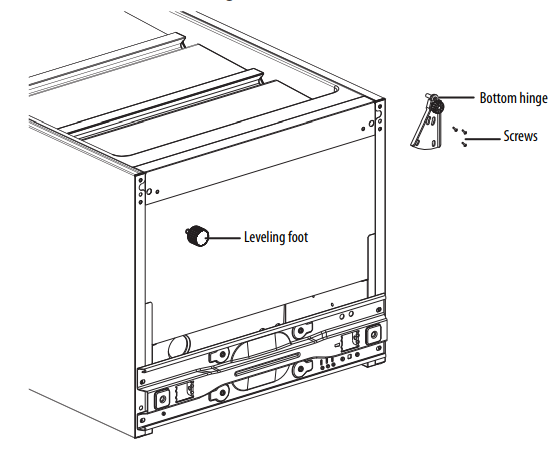
- Unscrew and remove the leveling foot. Remove the hinge screws, then remove the bottom hinge.

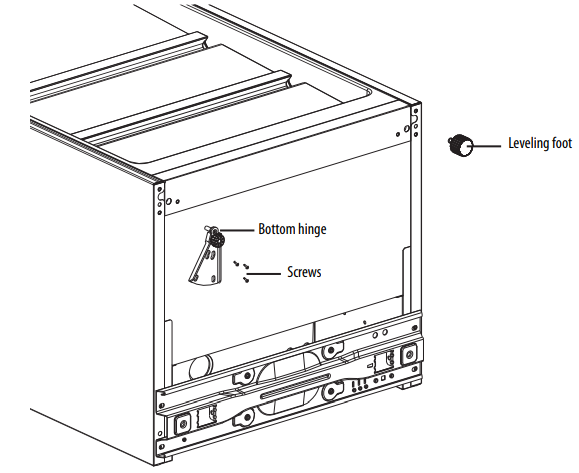
- Install the leveling foot on the right side and the bottom hinge on the left side.
- With your freezer upright, lower the door on the bottom hinge. Make sure that the door gasket fits tightly.
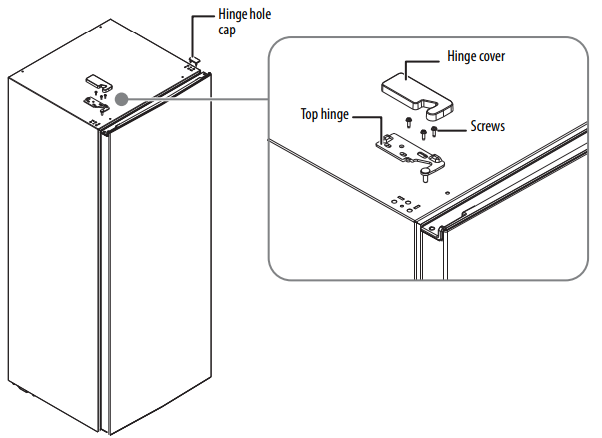
- Remove the top left hinge and hinge cover from the accessory bag.
- Secure the top hinge with the three screws you removed earlier, then install the hinge cover. Install the hinge hole cap on the right side.
Grounding requirement
Your freezer must be grounded. Your freezer is equipped with a cord having a grounding wire with a grounding plug. The plug must be inserted into an outlet that is correctly installed and grounded. Consult a qualified electrician or service person if you do not completely understand the grounding instructions, or if you think your freezer may not be correctly grounded.
Connecting to power
- Plug your freezer into a dedicated, correctly installed, grounded wall outlet.
- Use a separate electrical circuit from other operating appliances. Do not under any circumstances cut or remove the third (ground) prong from the power cord. If you have questions about power or grounding contact a certified electrician or an authorized service center.
- Plug in and run your freezer for two to three hours before making any temperature adjustments and before adding food. This lets your freezer reach a stable temperature.
Using your freezer
- The storage life of frozen foods varies. You should use the food before the recommended storage time expires.
- Place frozen food into your freezer as quickly as possible after purchase. If there are instructions on the packaging, carefully follow these instructions regarding storage times.
- Prepackaged, commercially frozen food should be stored according to the frozen food manufacturer’s instructions for a three-star frozen food storage compartment or home freezer.

- Shelves are provided for the organization of odd-shaped items.
Turning your freezer on
- Plug the power cord into a power outlet.

- Turn the thermostat knob to the temperature you want. MIN is the warmest temperature. MAX is the coolest temperature. The temperature range is 10.4°F
to -11.2°F (-12°C to -24°C).
Adjusting the shelves
- Tilt the front of a shelf up, then lift the shelf out of your freezer.
- To reinstall the shelf, tilt the front of the shelf up, slide the shelf into your freezer, then lower the shelf front.
Storing food during a power failure
- Foods can be preserved for a couple of hours even in summer in case of power failure.
- To keep the interior temperature cold, avoid opening the door.
- Do not put fresh food into your freezer until the power comes back on.
Maintaining your freezer
Cleaning your freezer
Your freezer is designed for year-round use with only minimal cleaning and maintenance.
- Unplug your freezer from the power outlet.
- Remove all food.
- Wash the shelves with a mild detergent solution.
- Wash the inside and outside with a cloth dampened with a non-corrosive, neutral detergent. If you use a detergent, remove the residual detergent with a cloth dampened with clear water. Do not use excessive detergent or water.
- Too much liquid may damage the electrical insulation.
- Dry the inside and outside with a soft cloth or towel.
- Make sure that you keep the door gasket (seal) clean so that the door seals tightly. This helps your freezer run efficiently.
Defrosting your freezer
- Unplug your freezer.
- Remove all food from your freezer, and place the food into containers that prevent it from melting.
- To speed up the defrosting, you can:
- Place a fan blowing at its highest speed pointed right at your freezer. The ice melts faster. After the ice melts, use towels to wipe up excess water, then use the fan to speed drying.
- Place containers with hot water inside your freezer.
- Use a plastic or wooden ice shovel (like a spatula) to remove thick layers of ice or frost. Do not use a sharp utensil (like a knife) because you may damage your freezer.
- Use a cloth dampened with water or a mild cleaning solution to clean the inside of your freezer.
- When you finish defrosting, wipe the inside with a dry towel.
- Close your freezer, plug it into the power outlet, then put the food back into your freezer.
Storing your freezer
- Unplug your freezer from the power outlet.
- Remove all food.
- Clean your freezer.

- Take off the doors, and leave the shelves in place so that children may not easily climb inside.
Moving your freezer
- Unplug your freezer from the power outlet.
- Remove all food.
- Securely tape down all loose items inside your freezer.
- Tape the door shut.
- Push or pull on your freezer’s body. Do not hold the door or hinges.
- Make sure that your freezer does not tilt more than 45° from the upright position during transportation.
Tips on saving energy

- Locate your freezer in the coolest area of the room, away from heat-producing appliances or heating ducts, and out of direct sunlight.
- Let hot foods cool to room temperature before placing them in your freezer.
- Overloading your freezer forces the compressor to run longer. Foods that freeze too slowly may lose quality or spoil.
- Wrap foods correctly and wipe containers dry before placing them in your freezer. This cuts down on frost build-up inside your freezer.
- Do not line the freezer storage shelves with aluminum foil, wax paper, or paper towels. Liners interfere with cold air circulation and make your freezer less efficient.
- Organize and label food to reduce door openings and extended searches.
- Remove as many items as needed at one time, and close the door as soon as possible.
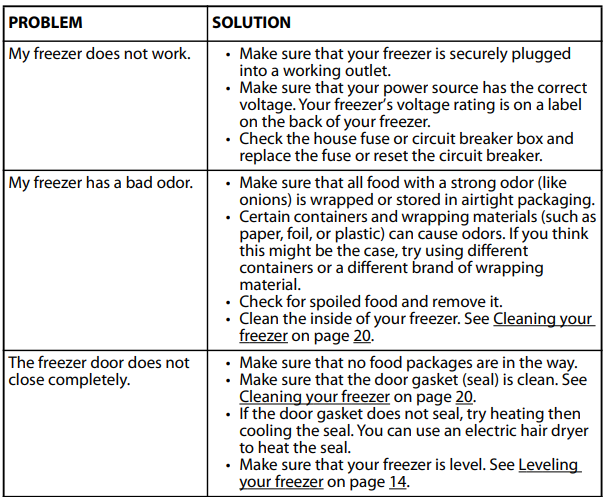
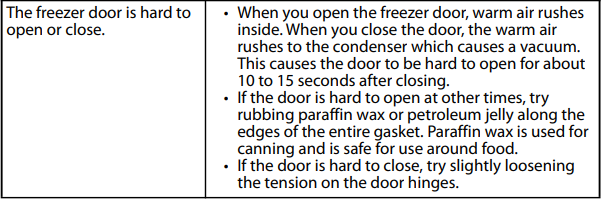
Troubleshooting
Specifications
| Dimensions (H ×W × D) | 56.3 × 21.7 × 22.4 in. (143 × 55 x × 57 cm) |
| Weight | 99.2 lbs (45 kg) |
| Power requirements | 115V~60Hz |
| Current | 1.5 A |
| Temperature range | 10.4°F to -11.2°F (-12°C to -24°C) ± 5°F (3°C) |
| Power cord length | 5.4 ft. (165 cm) |
| Power consumption per year | 331 kWh |
| Certifications | UL and DOE approved |
ONE-YEAR LIMITED WARRANTY
Definitions:
The Distributor* of Insignia branded products warrants to you, the original purchaser of this new Insignia-branded product (“Product”), that the Product shall be free of defects in the original manufacturer of the material or workmanship for one (1) year from the date of your purchase of the Product (“Warranty Period”).
For this warranty to apply, your Product must be purchased in the United States or Canada from a Best Buy branded retail store or online at www.bestbuy.com or www.bestbuy.ca and is packaged with this warranty statement.
How long does the coverage last?
The Warranty Period lasts for 1 year (365 days) from the date you purchased the Product. Your purchase date is printed on the receipt you received with the Product.
What does this warranty cover?
During the Warranty Period, if the original manufacture of the material or workmanship of the Product is determined to be defective by an authorized Insignia repair center or store personnel, Insignia will (at its sole option):

- repair the Product with new or rebuilt parts; or
- replace the Product at no charge with new or rebuilt comparable products or parts
Products and parts replaced under this warranty become the property of Insignia and are not returned to you. If service of Products or parts is required after the Warranty Period expires, you must pay all labor and parts charges.
This warranty lasts as long as you own your Insignia Product during the Warranty Period. Warranty coverage terminates if you sell or otherwise transfer the Product.
How to obtain warranty service?
If you purchased the Product at a Best Buy retail store location or from a Best Buy online website (www.bestbuy.com or www.bestbuy.ca), please take your original receipt and the Product to any Best Buy store.
Make sure that you place the Product in its original packaging or packaging that provides the same amount of protection as the original packaging. To obtain warranty service, in the United States and Canada call 1-877-467-4289. Call agents may diagnose and correct the issue over the phone.
Where is the warranty valid?
This warranty is valid only in the United States and Canada at Best Buy branded retail stores or websites to the original purchaser of the product in the county where the original purchase was made.
What does the warranty not cover?
This warranty does not cover:
- Customer instruction/education
- Installation
- Set up adjustments
- Cosmetic damage
- Damage due to weather, lightning, and other acts of God, such as power surges
- Accidental damage
- Misuse
- Abuse
- Negligence
- Commercial purposes/use, including but not limited to use in a place of business or communal areas of a multiple dwelling condominium or apartment complex, or otherwise used in a place other than a private home.
- Modification of any part of the Product, including the antenna
- Display panel damaged by static (non-moving) images applied for lengthy periods (burn-in).
- Damage due to incorrect operation or maintenance
- Connection to an incorrect voltage or power supply
- Attempted repair by any person not authorized by Insignia to service the Product
- Products sold “as is” or “with all faults”
- Consumables, including but not limited to batteries (i.e. AA, AAA, C, etc.)
- Products where the factory-applied serial numbers have been altered or removed
- Loss or Theft of this product or any part of the product
- Display panels containing up to three (3) pixel failures (dots that are dark or incorrectly illuminated) grouped in an area smaller than one-tenth (1/10) of the display size or up to five (5) pixel failures throughout the display. (Pixel-based displays may contain a limited number of pixels that may not function normally.)
- Failures or Damage caused by any contact including but not limited to liquids, gels, or pastes.
Contact Insignia:
- 1-877-467-4289
- www.insigniaproducts.com
- INSIGNIA is a trademark of Best Buy and its affiliated companies.
- *Distributed by Best Buy Purchasing, LLC
- 7601 Penn Ave South, Richfield, MN 55423 U.S.A.
- ©2019 Best Buy. All rights reserved.
- Made in China
For More Manuals by Insignia, Visit LatestManuals

