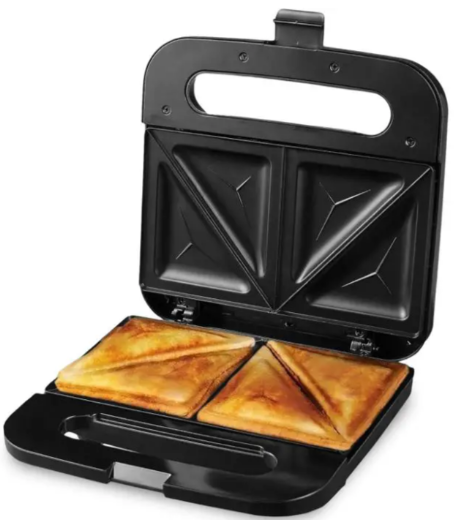
Ovente GPS401 series Electric Sandwich Maker

IMPORTANT SAFEGUARDS
When using this Sandwich Maker, basic safety precautions should always be followed, including:
- Before connecting the appliance, check whether the voltage indicated at the bottom of the sandwich maker corresponds to the local mains voltage.
- DO NOT operate any appliance with a damaged cord or plug, or after the appliance malfunctions, or has been damaged in any manner. If the mains cord is damaged, please contact Customer Support at 1-855-926-2626 immediately.
- To protect against electrical hazards, DO NOT immerse the cord, plugs, or the appliance itself in water or other liquids.
- DO NOT let the cord hang over the edge of a table or counter, and do not let it touch hot surfaces.
- Regularly check the mains cord to see whether it is still in a safe condition.

- Do not operate high-voltage appliances on the same circuit overload.
- Turn the switch off before connecting or disconnecting the plug from the power outlet.
- Unplug from the outlet when not in use and before cleaning.
- Do not place on or near hot gas, an electric burner, or in a heated oven.
- This sandwich maker should always be used on a dry, level, heat-resistant surface.
- Close supervision is necessary when the appliance is used near children.
- This appliance is not intended to be used by persons (including children) with reduced physical, sensory, and mental capabilities. This appliance is not for persons with a lack of experience and knowledge unless they have been given supervision or instruction concerning the use of the appliance by a person responsible for their safety.
- Accessory attachments not recommended by the appliance manufacturer may cause injuries.
- This appliance is not intended for deep frying. Do not pour oil or grease on the non-stick plates, as it may cause fire damage.
- DO NOT touch hot surfaces. Use handles.
- DO NOT move the unit when it is still hot.
- Extreme caution must be used when moving an appliance containing hot food.
- When in use, keep the sandwich maker away from flammable materials, including furniture and curtains.
- Do not attempt to dislodge food when the appliance is still plugged into the wall outlet.
- DO NOT leave unattended while in use.
- The sandwich maker is not intended to be operated with an external timer or separate remote-control system.
- Do not use outdoors or for purposes other than intended use.
- CAUTION: This appliance generates heat during use. Proper precautions must be taken to prevent the risk of burns, fires, or other damage to property caused by touching the appliance while in use or during cooling.
- POLARIZED PLUG: This appliance has a polarized plug (one blade is wider than the other). This plug is intended to fit into a polarized outlet only. If the plug does not fit fully into the outlet, reverse the plug and try again. If it still does not fit, contact a qualified electrician. Do not attempt to modify the plug in any way.
- CAUTION: A short power-supply cord is provided to reduce the risk of personal injury resulting from becoming entangled in or tripping over a longer cord. Extensions are available from local hardware stores and may be used to make the cord longer. If an extension cord is required, special care and caution are necessary: (1) The marked electrical rating of the extension cord should be at least as great as the electrical rating of the appliance, (2) the extension cord should be a grounding 3-wire cord, and (3) the extension cord should be arranged so that it will not drape over the countertop or tabletop where it can be pulled by children or tripped over unintentionally.
parts & features

ELECTRICAL REQUIREMENTS
- Voltage: 120V
- Hertz: 60Hz
- Wattage: 750W
USING your SanDwich maker
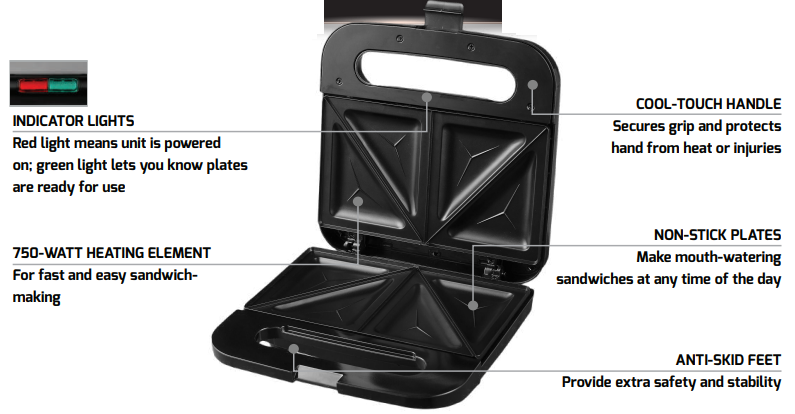
WARNING: DURING COOKING, ONLY TOUCH THE COOL-TOUCH HANDLES.
NOTE: On first use, you may notice smoke. This is normal due to the initial heating of the internal components.
- Wipe the non-stick cooking plates with a damp cloth or sponge.
- When you first plug in the sandwich maker, the red light will illuminate to let you know the unit is on. Once the green light illuminates, the sandwich maker is ready for use. Note that during cooking, the green indicator light will cycle on and off to maintain the correct temperature.
- For a crispy, golden-brown sandwich spread a thin layer of butter or margarine on the outward-facing slices.
- Lay one buttered slice facing downwards on the lower cooking plate. Add your filling and cover with the second slice of bread with the buttered side facing the upper cooking plate. Note: Although there is room for two sandwiches, you can toast only one sandwich if needed.
- For optimal results, the filling should be placed well within the sandwich slices. Lower the upper cooking plate carefully onto the bread until the sandwich maker is tightly clamped.
- After 2-3 minutes lift the cool-touch handle to check whether the toasted sandwich is sufficiently brown. The cooking time required to obtain crisp, golden-brown sandwiches depends on the type of bread, fillings, and your taste.
- Once cooked, use a non-metallic utensil to remove the toasted sandwich. Do not use sharp or abrasive kitchen utensils to cut your sandwich while it is on the non-stick plates.
- After use, unplug the sandwich maker from the wall outlet, and allow it to cool completely before cleaning or storing.
care & maintenance
- After use, unplug the sandwich maker from the wall outlet and allow it to cool completely.
- Wipe the cooking plates with a sponge or cloth dampened in warm, soapy water.
- For stubborn grease, apply a small amount of cooking oil and leave it on for several minutes. Remove with a paper towel. Wipe non-stick plates with a damp cloth.
- Do not use abrasive or metal utensils.
- Wipe exterior surfaces with a damp cloth.
- Do not immerse the appliance in water or any other liquids.
OVENTE WARRANTY
LIMITED ONE (1) ONE-YEAR WARRANTY
At Ovente, we aim to make your life easier by producing top-quality housewares, designed with you in mind. We have pledged to uphold all our offerings to the highest standards, and we back all our sandwich makers with a one-(1) year warranty from the date of purchase from an authorized retailer.
This warranty covers defects in workmanship and materials. It does not include damage due to abuse, misuse, commercial use, accidents, or natural wear and tear. In case of replacement, shipping and handling fees may apply.
LIMITATIONS
The warranty stated above is the only warranty applicable to this product. Other expressed or implied warranties are hereby disclaimed. No verbal or written information given by the Manufacturer, its agents, or employees shall create a guarantee or in any way increase the scope and duration of this warranty. Repair or replacement as provided under this warranty is the exclusive remedy of the consumer.
The manufacturer shall not be liable for incidental or consequential damages resulting from the use of this product. Any implied warranty of merchantability or fitness for a particular purpose on this product is limited to the applicable warranty period set forth above except to the extent prohibited by law.
Proof of purchase may be required to validate the order. Promotional items may not be covered under any warranty. Consumer rights may vary from state to state. For product support email support@ovente.com or call 1-855-926-2626.
Visit us at ovente.com
- Facebook.com/ovente
- @oventeTweets
- @Ovente youtube.com/ovente
For More Manuals by Ovente, Visit Latest Manuals
FAQs About Ovente GPS401 series Electric Sandwich Maker
How to clean an oven sandwich maker?
Before cleaning, unplug the sandwich maker and allow it to cool. Use a sponge or moist towel to wipe down the cooking plates. Keep the water from getting inside the appliance. It is possible to store the appliance vertically.
What is the purpose of a sandwich maker?
It can be used to prepare a huge assortment of sandwiches! They can also be used to produce waffles, pancakes, burgers, and paninis in addition to sandwiches. When you want to have a quick and easy lunch or snack at home, these are all incredibly convenient to utilize.
What is the working principle of a sandwich maker?
To accommodate the height of a constructed, raw sandwich, a sandwich maker is hinged. When the lid is closed, the bread browns, and the components within warm up and come together, forming a single, cohesive unit—at least if cheese is used—when you remove the sandwich.
How many watts is good for a sandwich maker?
Conversely, a low-wattage sandwich maker can take longer to cook your sandwich and save you less time. Generally speaking, a good sandwich maker should have a wattage of 700–750.
Is the sandwich maker washable?
Use a damp towel to clean the outside of your sandwich or panini maker. The plates can be cleaned by doing the following with a damp cloth or a gentle sponge: Please remember not to submerge the device in water.
Is it okay to wash the sandwich maker?
After using a moist cloth to wipe the exterior, let it dry. If needed, use soapy water to wipe the toasting plates with a moist cloth before completely drying them. Abrasive cleansers should not be used since they will harm the non-stick coating. To keep the sandwich toaster in good operating order, clean it after each usage.
Is a sandwich maker necessary?
Pressing, squashing, or compressing two bread slices together is the primary function of a sandwich press. Although this kind of work can be completed by hand, there are several reasons why your kitchen needs this kind of equipment. You may press thin bread slices without damaging them if you use the correct sandwich press machine.
How do you store a sandwich maker?
Keep the gadget out of children’s reach in a dry, clean location. Advice: You can free some space in your kitchen by storing the sandwich maker vertically.
Can you cook in a sandwich maker?
You may also experiment with delectable omelets, calzones, quesadillas, pastries, and much more. It’s not just for sandwiches, either.
How long does a sandwich maker take?
Once the lid is closed, heat for around 4–5 minutes, or until the food is cooked and browned. 5. Turn off your sandwich toaster and take the toast out with care.

